


- Go to www.walmart.com/account and sign-in
- At the purchase history page find your Empava order
- Click on “Write a review”
- Once you wrote a review, remember to screenshot it. (For Windows: Press Windows + PrintScreen) and (For Mac: Command-Shift-3)
- Please visit our website at www.empava.com/reward
- Fill out all required information and choose your desired rewards
- Upload the saved screenshot
- Submit the form
- Please allow 2-3 business days to work on your submission.
If you encounter any trouble, please contact us.
- Please visit homedepot.com and sign-in
- Click on Track Order at the top right hand corner
- Find the order with Empava
- Click on “Write a Review” underneath the Buy Again button.
- Once you wrote a review, remember to screenshot it. (For Windows: Press Windows + PrintScreen) and (For Mac: Command-Shift-3)
- Please visit our website at www.empava.com/reward
- Fill out all required information and choose your desired rewards
- Upload the saved screenshot
- Submit the form
- Please allow 2-3 business days to work on your submission.
If you encounter any trouble, please contact us.
- Please visit Lowes.com and sign-in
- Click on Order Status at the top right hand corner
- Find the order with Empava
- Click on “Write a Product Review”
- Once you wrote a review, remember to screenshot it. (For Windows: Press Windows + PrintScreen) and (For Mac: Command-Shift-3)
- Go to your email, and click verify your product review.
- Please visit our website at www.empava.com/reward
- Fill out all required information and choose your desired rewards
- Upload the saved screenshot
- Submit the form
- Please allow 2-3 business days to work on your submission.
If you encounter any trouble, please contact us.
Guidelines For Answering Emails:
1. Log into Zendesk at the beginning of your shift.
2. Once logged in, you will see your assigned emails.
3. Open your first email, read it carefully and listen to the customers needs. Your job will be to gather as much information as you can to pass on to our US Customer Service Team along with adding notes. Below is an example of an email:
I have 2 - 24" stove top EMPV-24GC902 the main burner, that is to say the large burner or the front left burner will not stay lit... You have to hold down the button, Once it's late and you release the button the gas stops flowing the valve or the burner goes off please advise.
4. Reply to the customer. Below is an example of the information you should request:
- Hello, Thank you for contacting us at Empava Appliances. Where was your unit purchased? Please kindly note, we offer a 2 year warranty on parts if purchased with an authorized seller. If the burner goes on than off, it usually is a thermalcouple. Are you using this unit with natural gas or propane? Also is the middle or larger burner giving you this issue? If you can assist me with answering the following questions along with providing me with a detailed order
confirmation screenshot.
5. Add notes in Zendesk. - To add notes, you will need to have the email open and click on Internal Note.
6. Once you have added your notes, you can send your email.
7. Upon receiving the customers reply. Forward to a US Customer Service Team member.
*Should you have any questions or if you are unsure how to reply to an email. Feel free to let us know. Ensure each email receives a reply within 24 hours.
Gas Oven
- Igniter – igniting the flame for the oven and there are two of them. One for the top and one for the bottom. It has to be be replaced if the flame is not lighting and there is enough clearance/airflow at the bottom of the oven.
- Seal – To seal the door properly and keep the heat from leaking. Sometimes it needs to be replace.
- Thermal couple – a sensor to measure temperature. It is a safety feature to cut off gas if the flame went out for some reasons. If the flame cannot stay lite and it is not an airflow issue, it means thermal couple has to be replaced
- Gas Pressure Regulator- a control valve that reduces the input pressure of a fluid or gases to a desired value at its output. It can be used by lpg or natural gas.
- Nozzles - the natural gas nozzles are the default and already install in the oven. One nozzle is on the top and other one is on the bottom. A pair of lpg nozzle comes with the oven for lpg conversion. There is a number on each nozzle. The higher number go to the bottom and vice versa.
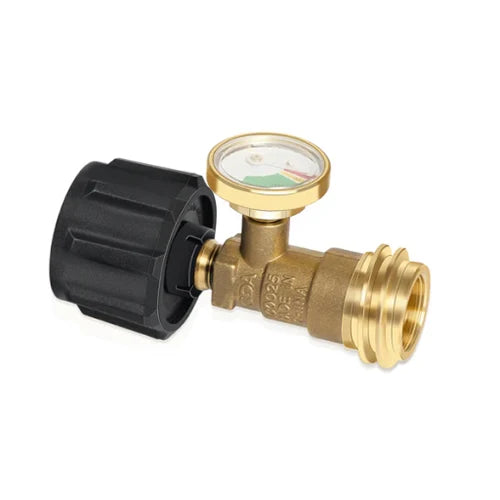
- Gas fitting - Not included with the oven. The gas connection of the oven is not US standard. The gas fitting serves as an adapter for the gas connection. For natural gas, use PSSD-42 and for lpg, use PSSL-15. Both part number are from home depot
- Control panel- Need to replace when all numbers are faded away.
- Oven door- it shatter easily during shipping – send the whole door even if just the glass is shattered.
- Oven rack- the oven comes with one. Additional has to be purchase.
- Baking tray – the oven comes with one. The ad stated the oven comes with 2 oven racks. The baking tray counts as one rack.
Gas Cooktop
- Burner Cap - cover the burner and sit on top of burner crown. Cap is not universal and depends on the crown.
- Burner Crown – house the burner cap. There are different type of cap but installing is universal. Cap and crown has to be a match.
- Nozzles- the natural gas nozzles are the default and already install in the cooktop. Each burner has one nozzle. A bag of lpg nozzle comes with the cooktop for lpg conversion. The highest number should be install on the largest burner and go in that order.
- Gas fitting - Not included with the cooktop. The gas connection of the cooktop is not US standard. The gas fitting serves as an adapter for the gas connection. For natural gas, use PSSD-42 and for lpg, use PSSL-15. Both part number are from home depot
- Grate- replace if it breaks. Also if the grates cannot sit flat, ask buyer to take a picture to see if the grate are wrong or installed incorrectly.
- Burner knob – replace if it breaks
- Gas Pressure Regulator- a control valve that reduces the input pressure of a fluid or gases to a desired value at its output. It can be used by lpg or natural gas.
- Thermal couple – a sensor to measure temperature. It is a safety feature to cut off gas if the flame went out for some reasons. If the flame cannot stay lite, it means thermal couple has to be replaced.
- Igniter – device that light the fire and it is next to the thermal couple. If the fire cannot be lite by the igniter but it can stay on if an external flame source is used, replace the igniter.
- Gas Valve- If the fire cannot be lite by the igniter nor an external flame source, replace the gas valve.
- Control panel- Need to be replace when all signs are faded away.
- Circuit board – If none of the burner can be lit, this has to be replace.
- Glass plate – sometimes customer want it to be replace if the glass plate cracked/shattered.
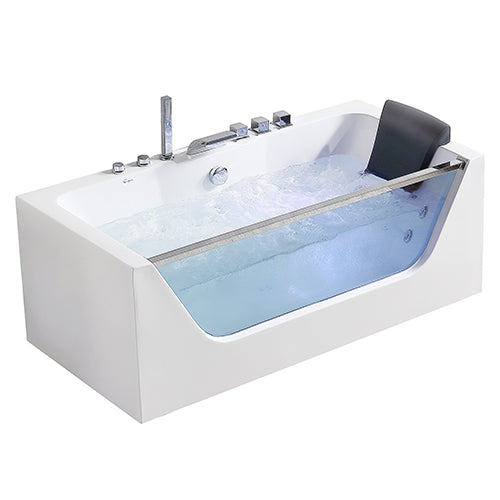
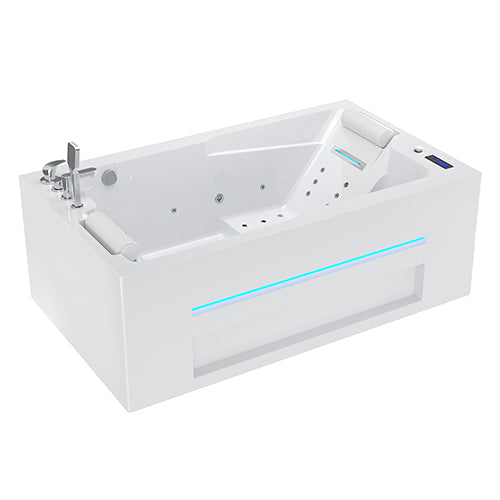
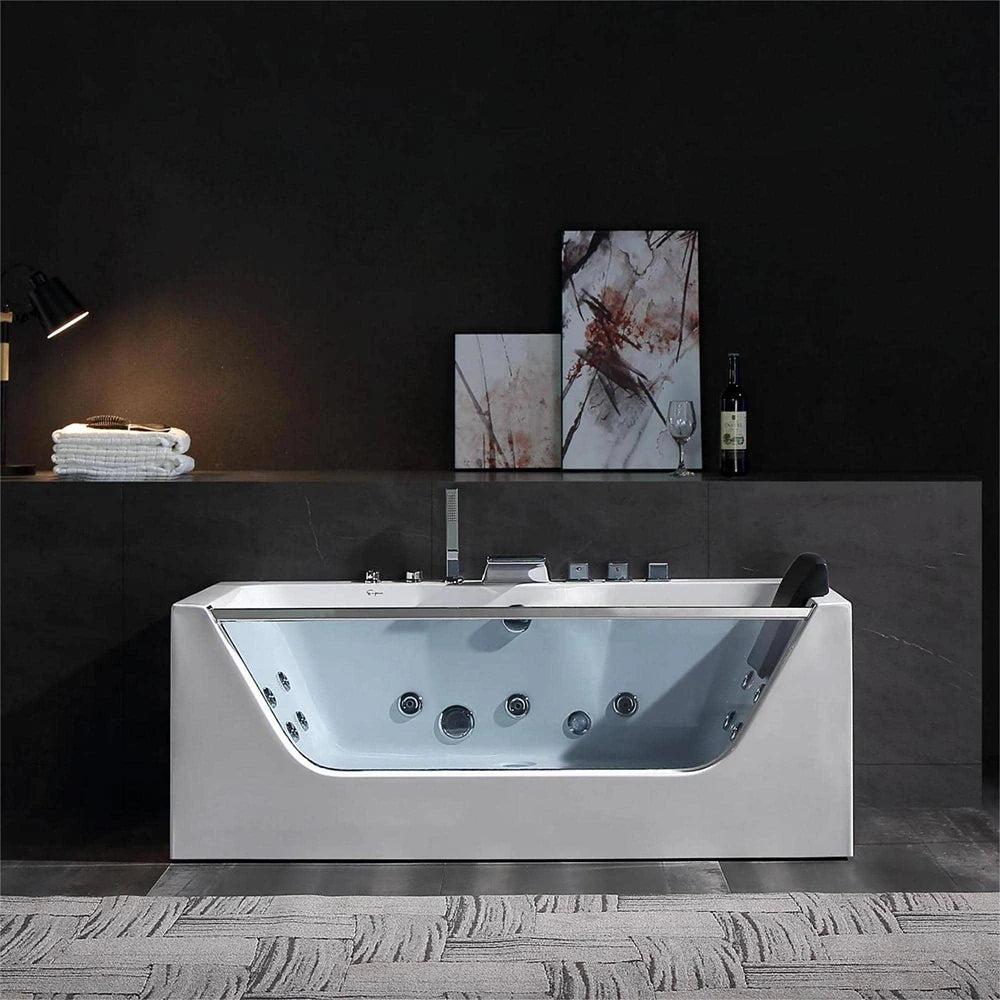
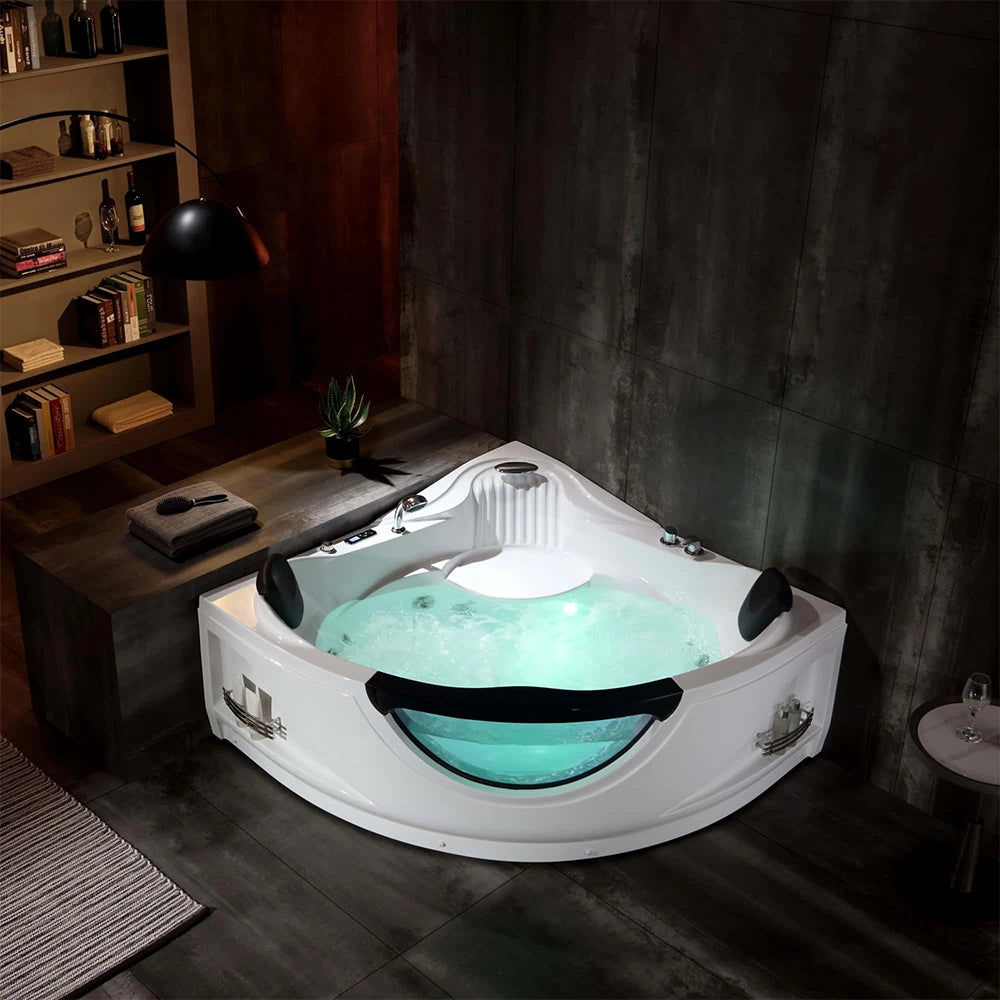
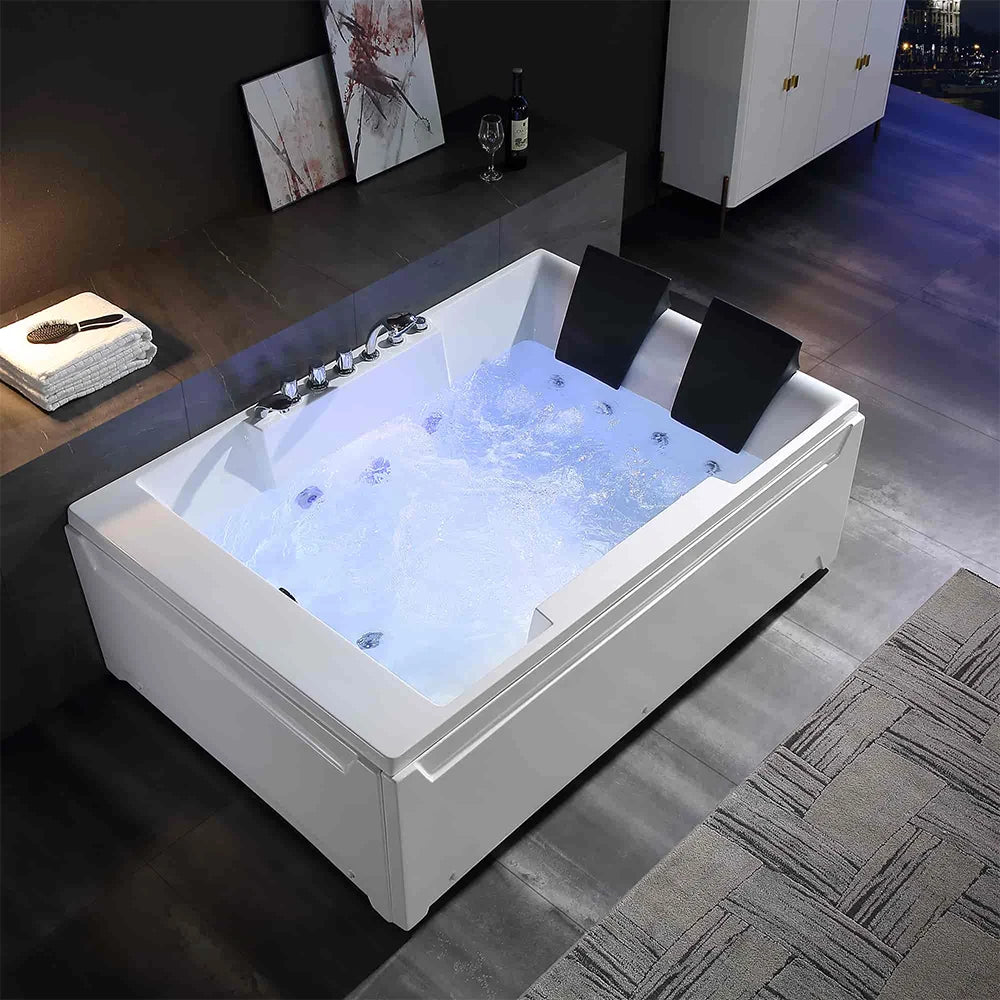
Jacuzzi Tub
- Air Pressure Pipe- Transparent Pressure Pipe that Connects ON/OFF Switch to Motor. If the motor cannot be turn on or turn off, check this pipe connection to the on/off switch and to the motor.
- Flex drain pipe: Only drainage part comes with the tub. Need to be sent if it is missing from the shipment.
- Motor – underneath the tube. It has an UL rating. If air pressure pipe connection is secure but the motor cannot be turn on. The motor has to be replaced.
- Drain and overflow – comes with preinstalled.
- The whole drain system – if the drain is not closing properly, the whole drain system has to be replaced.
Freestanding Gas Range
- Despite what is written in the owner manual, an external thermostat is needed to check the temperature of the oven.
Electric Oven:
- Control Panel: No lights, no sound, no functions work. Or if the writing has come off.
- Circuit Board: Neither function on the oven works, no sound or heat even after repowering unit on.
- Top Heating Element: If no heat is coming from the broil function.
- Bottom Heating Element: If no heat is coming from the bake function.
- Light Bulb: If the light does not come on when pressing the light icon.
- Glass Door: Door was damaged in transit or well oven was in use.
- Oven Seal: If the seal is coming off, or not included.
- Junction Box: If box with the wires is missing.
- Knobs: If missing or damaged
- E01 Error Code: Check if sensor wire is tighten and not loose.
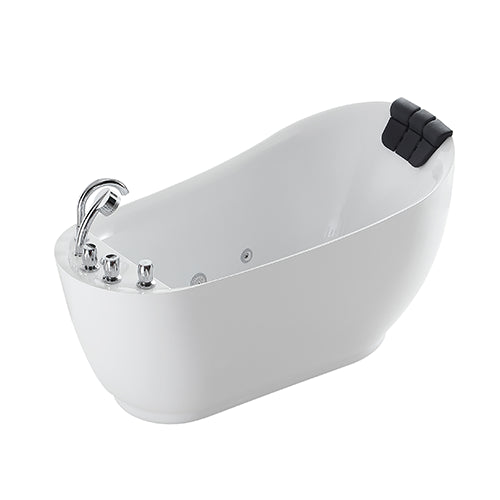
Free Standing Bath Tub:
- Drain: If leaking occurs or if the drain no longer stays down.
- Overflow: If leaking occurs.
- Flexible White Hose: If has a hole, leaking or customer did not receive.
- Feet: Bathtub feet were not included in the shipment.
Induction Cooktop:
- Circuit Board: If the unit has no power, no lights or sound even after troubleshooting.
- Main Board: If the unit worked previously, than stopped working with no lights, sound etc.
- Heating Pad: If one burner no longer works, or has an error code of “U”.
- Glass: If glass was broken in shipping or well in use.
Free Standing Gas Range:
Cooktop -
- Thermalcouple: If the burner flame goes on, than off. Even after holding down the knob for about 5 seconds.
- Igniter: Burner does not click, nor can you light it with an external flame.
- Grate / Burner Cap / Burner Head: If parts are missing or defective.
- Gas Valve: If no flame and the burner cannot be lit with an external flame.
- Knobs: If missing or defective.
- Door: If damaged or defective well using.
Oven –
- Thermalcouple: If flame comes on in the oven and goes out.
- Igniter: If flame does not come on, or if the burner cannot be lit with an external flame.
- Gas Valve: If oven does not maintain the heat (goes up and down).
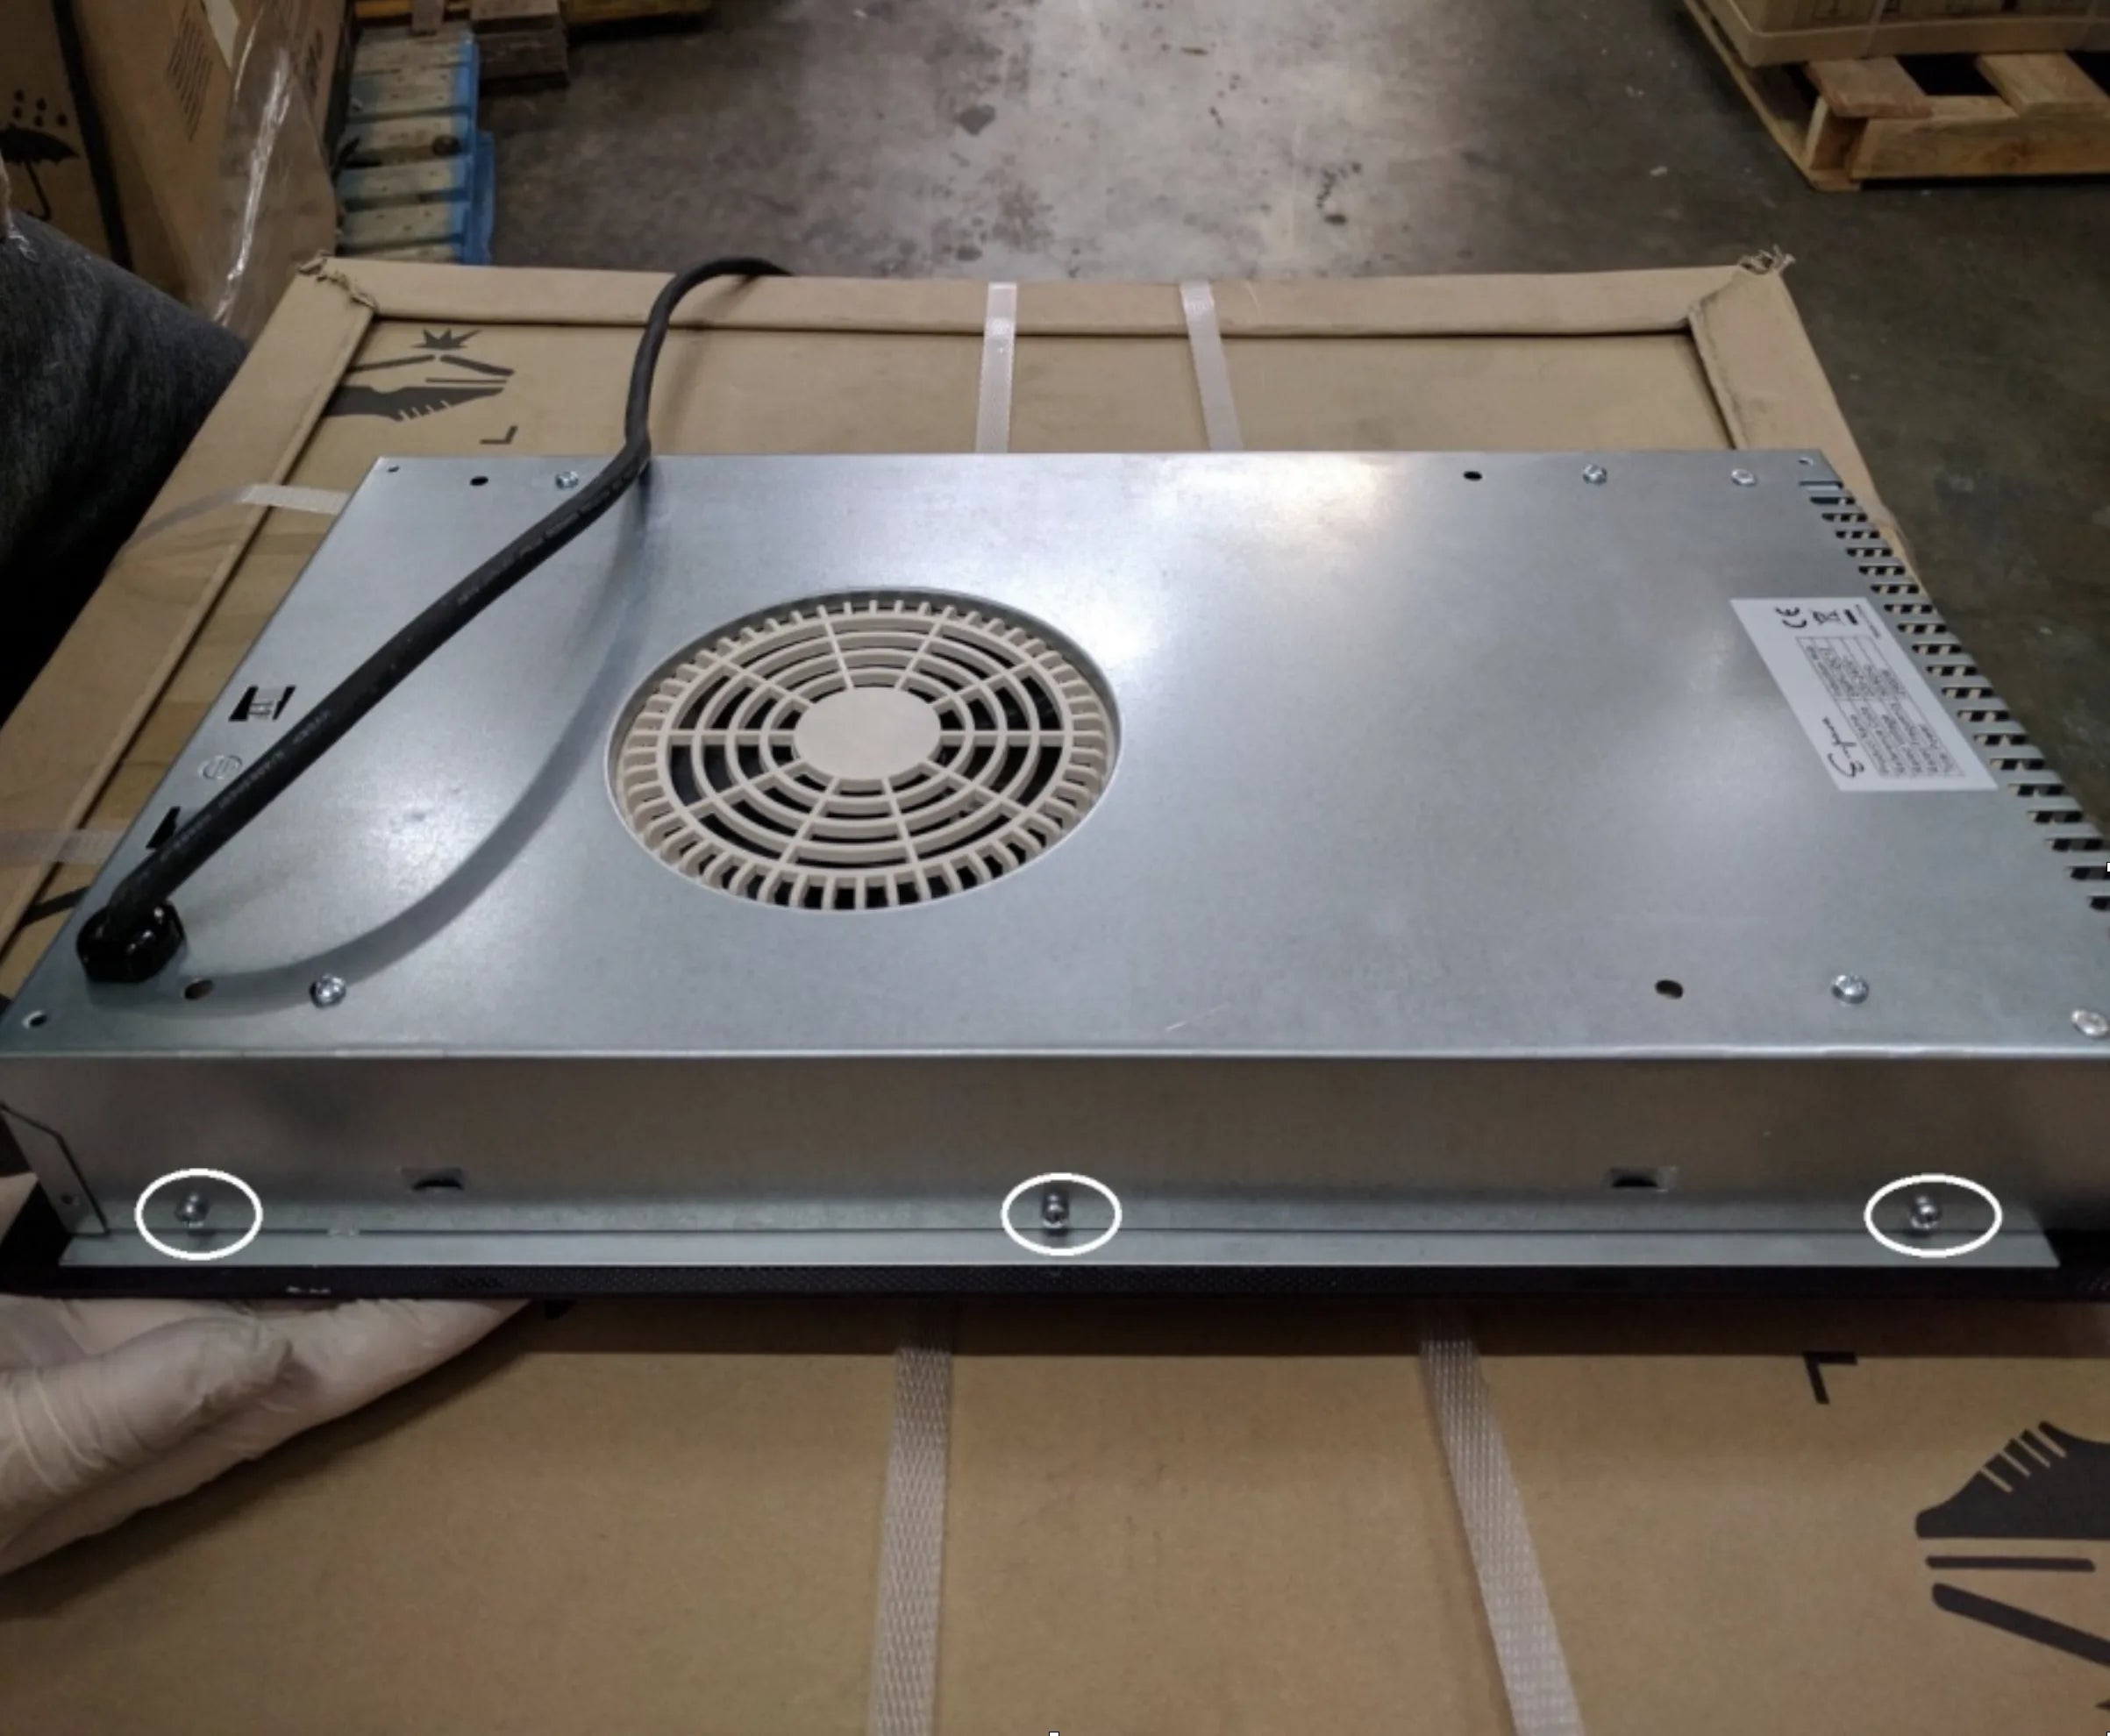
Induction Cooktop Circuit Board Removal
Step 1
Remove the six screws showed below figure (3 Screws on each side). Then remove the top cover (Black surface)
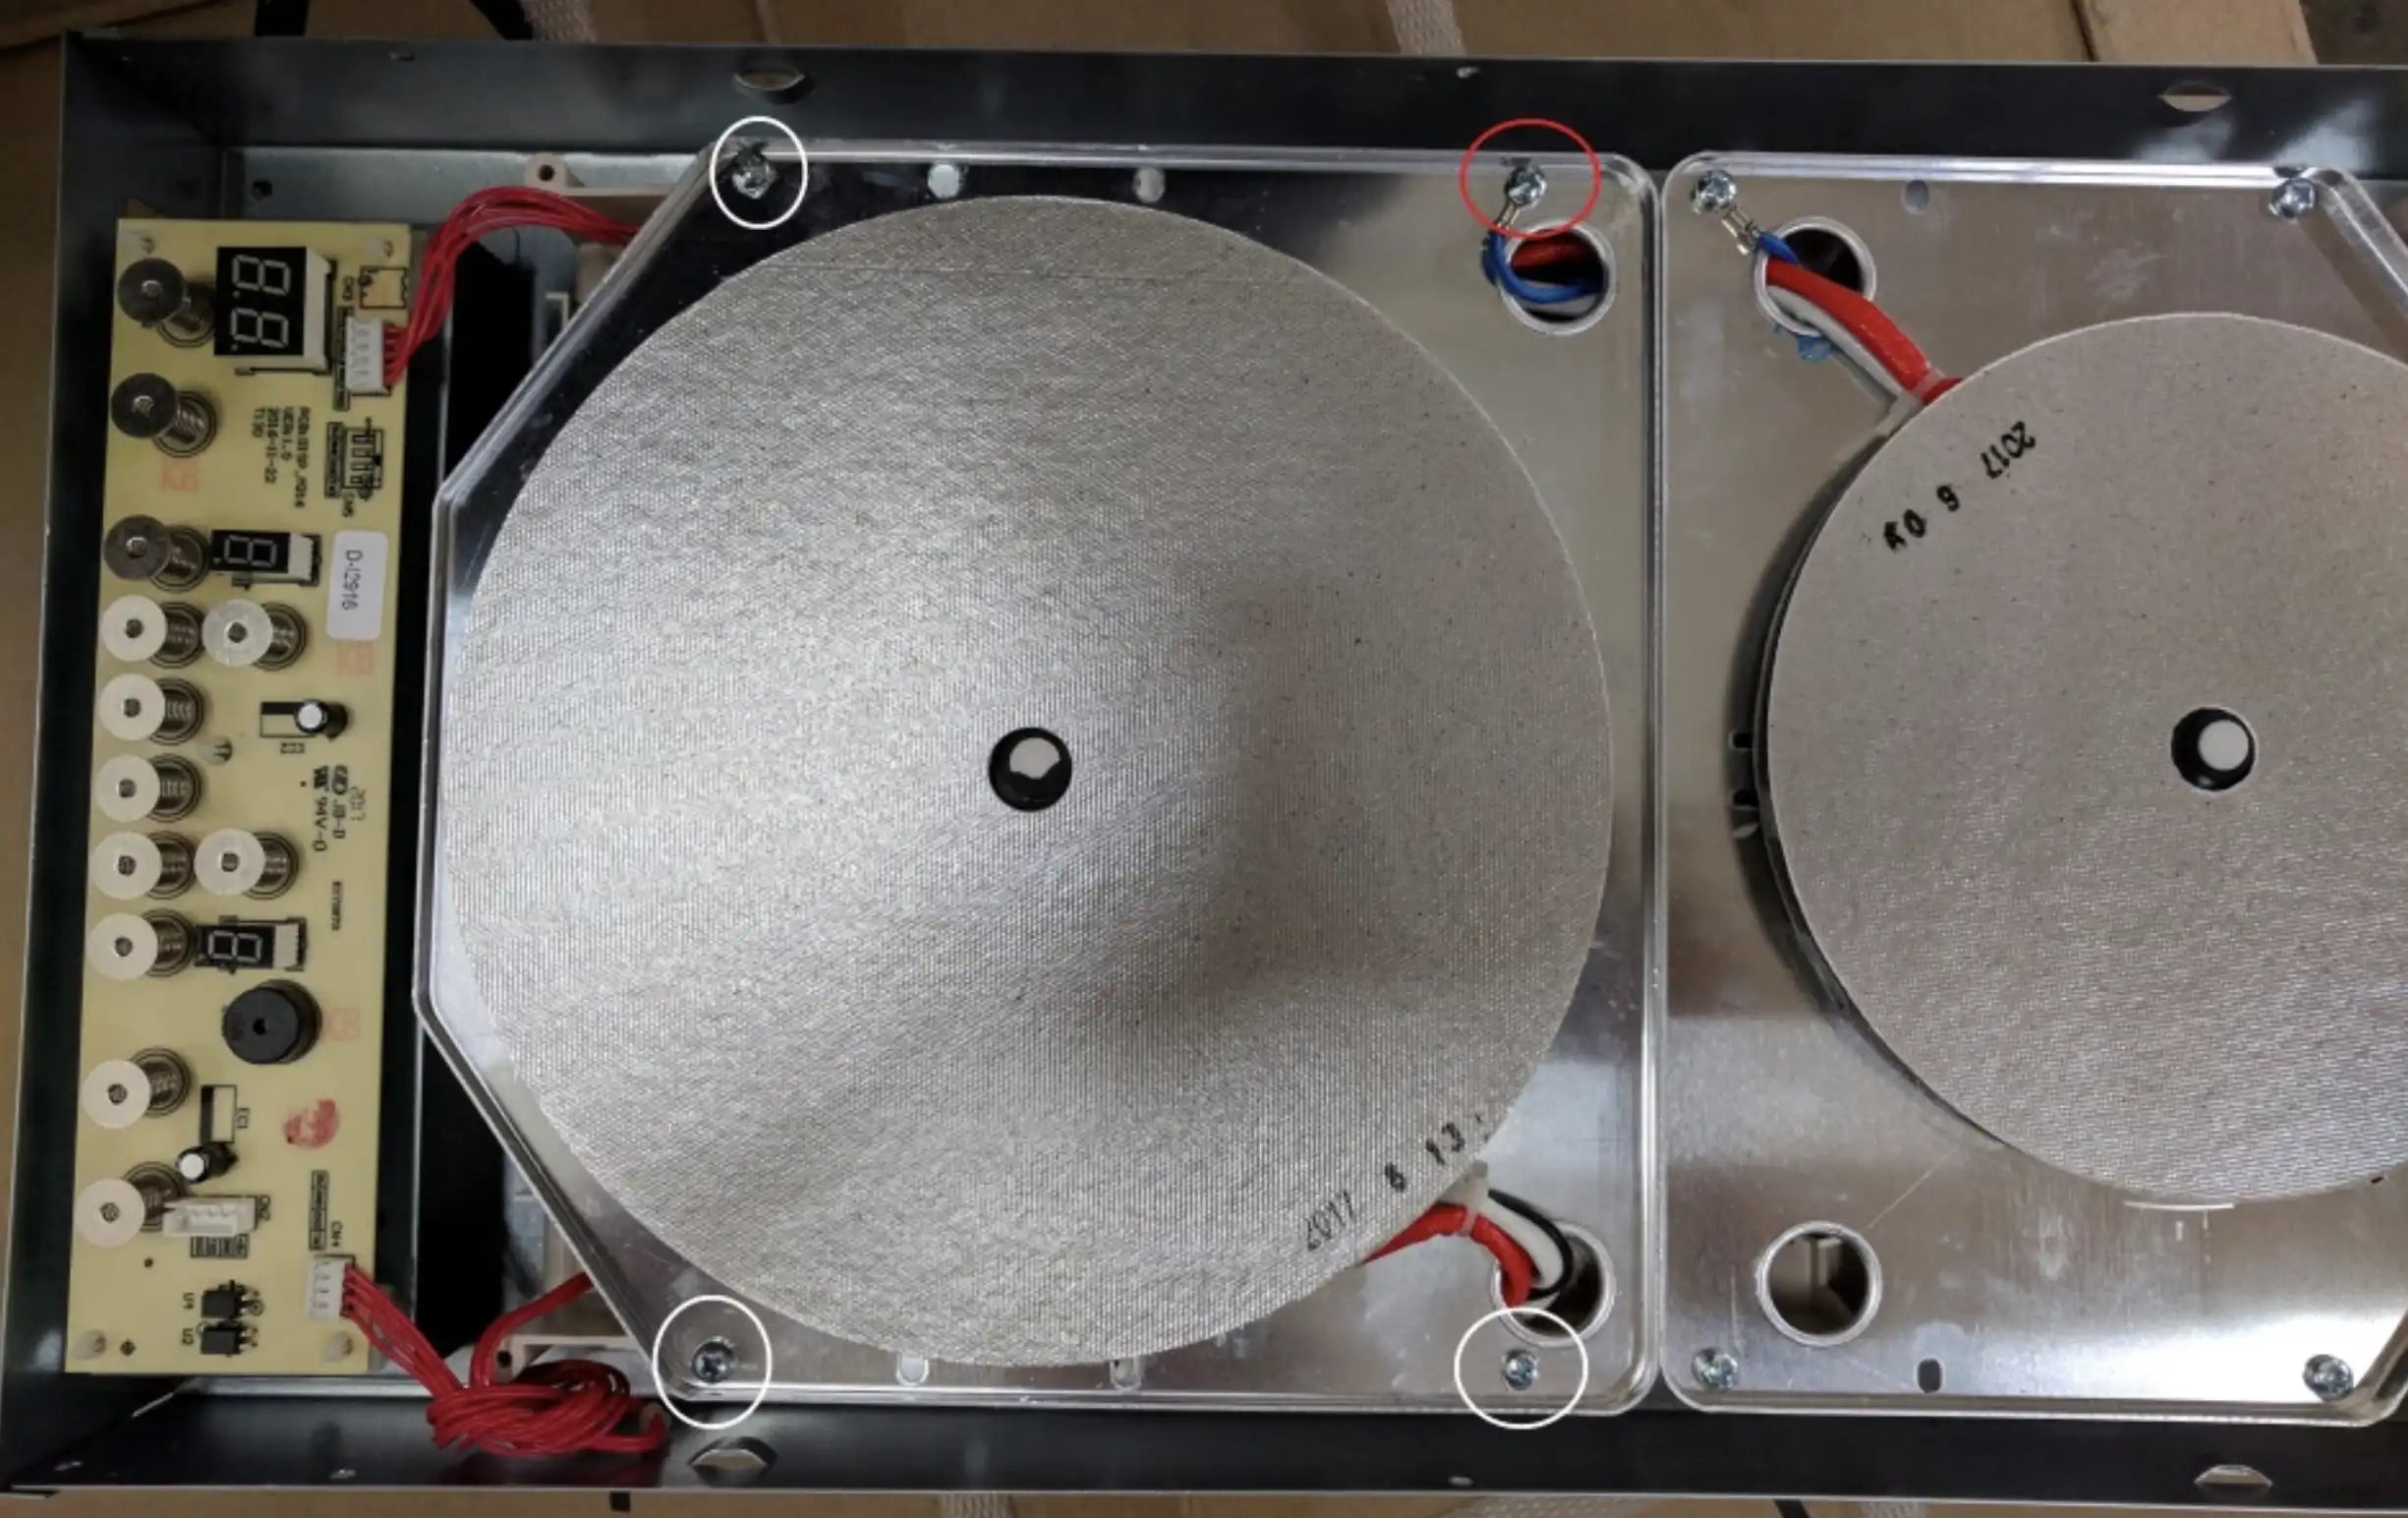
Step 2
Remove the four screws showed in below figure
Note: The screw that is marked by red circle is a different screw than other three.
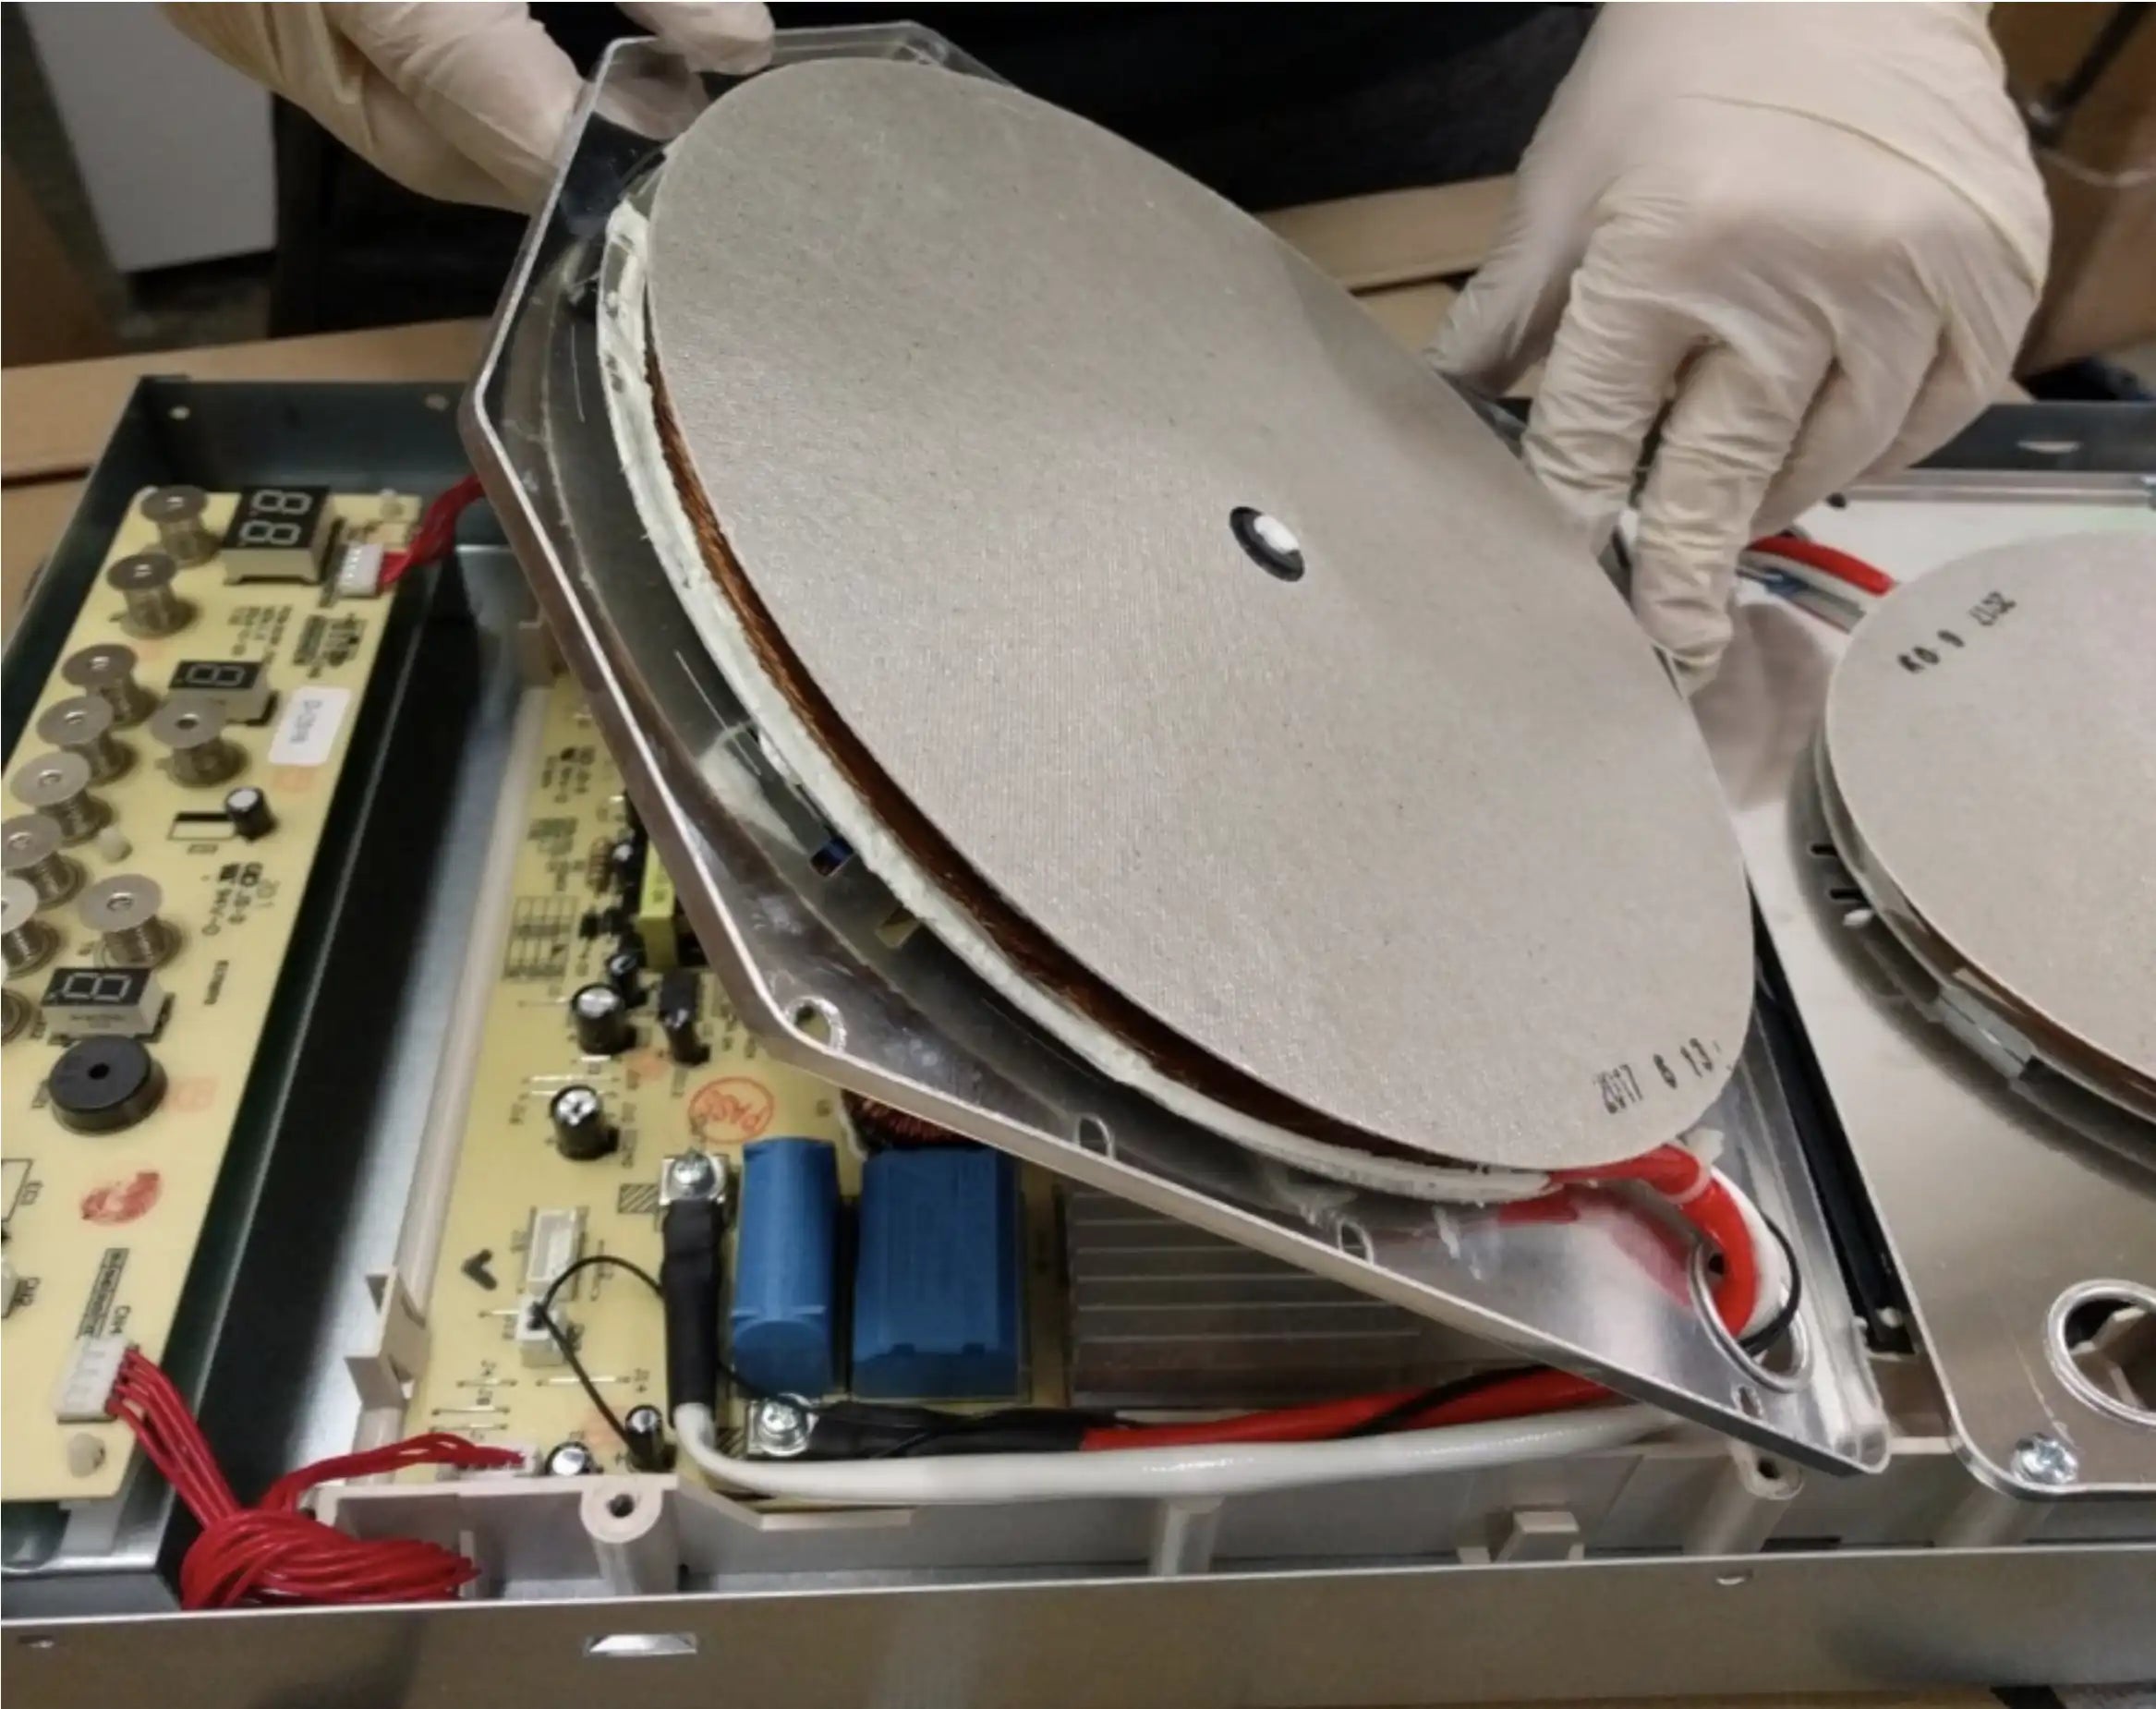
Step 3
The induction base can now be flipped over and then you will be able to see the circuit board that needs to be replaced
Step 4
Remove the four screws circled in white from below figure
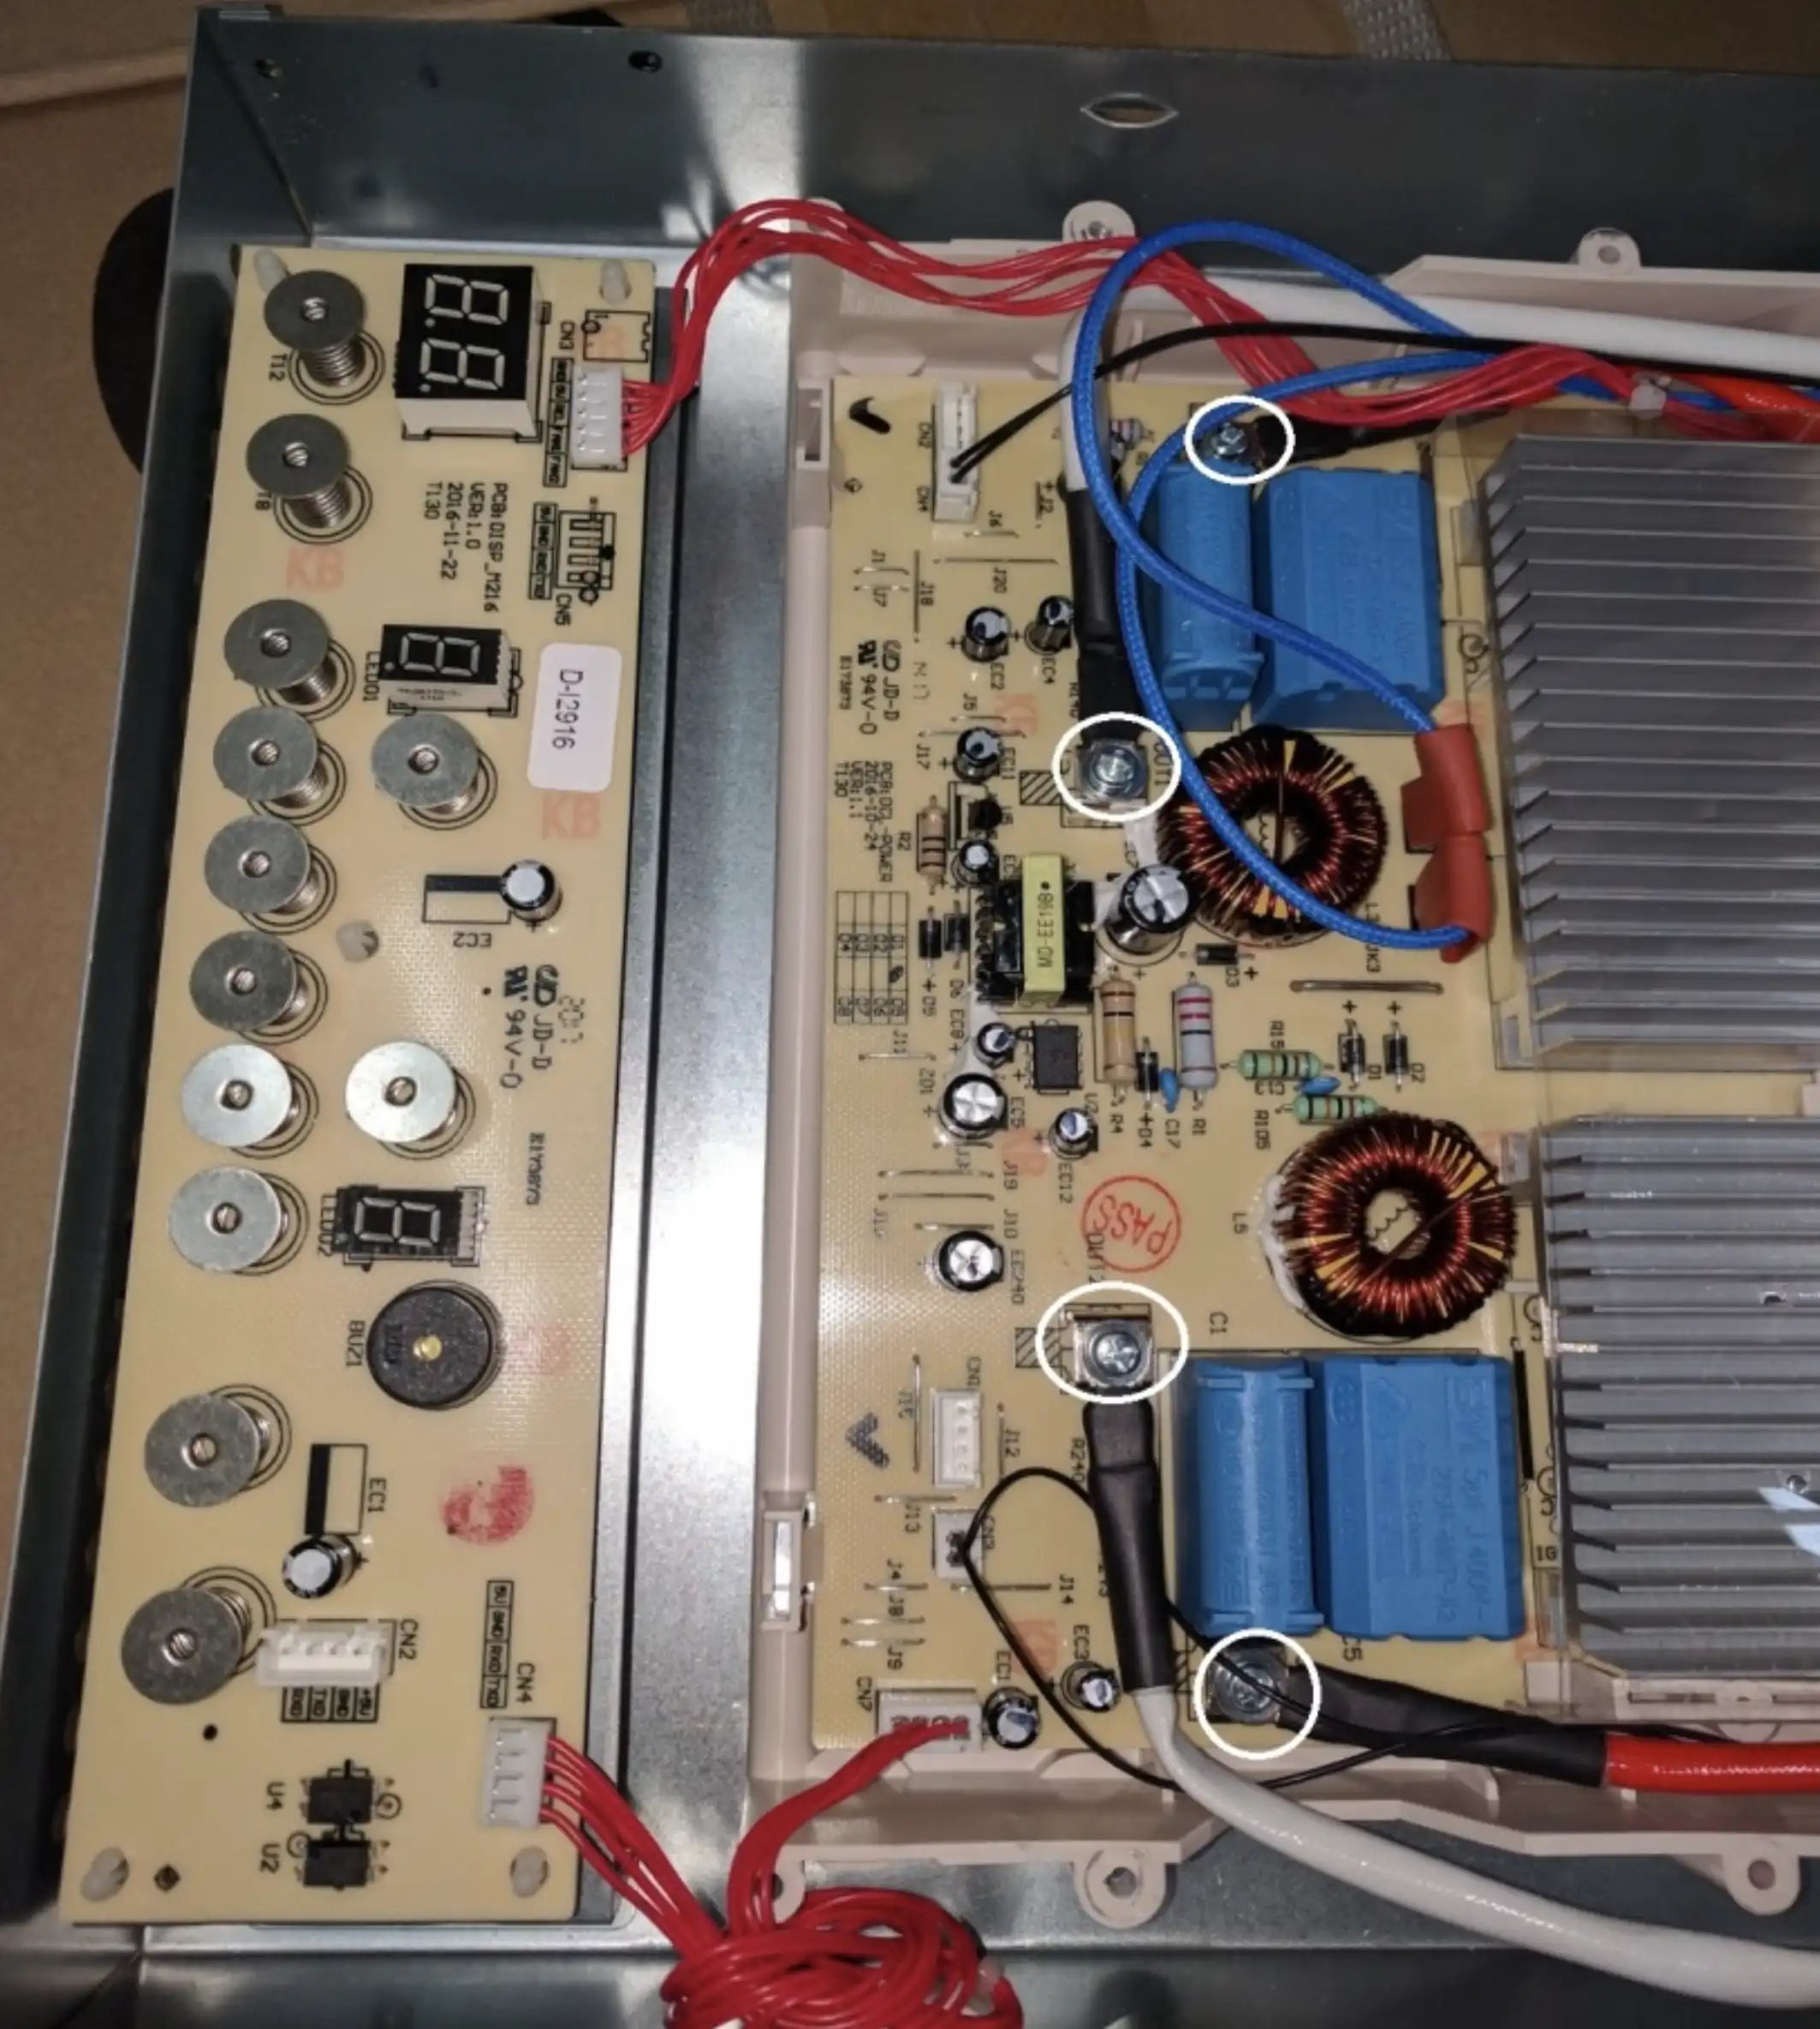
Step 5
Unplug the connectors from below figure which is marked by White Rectangle
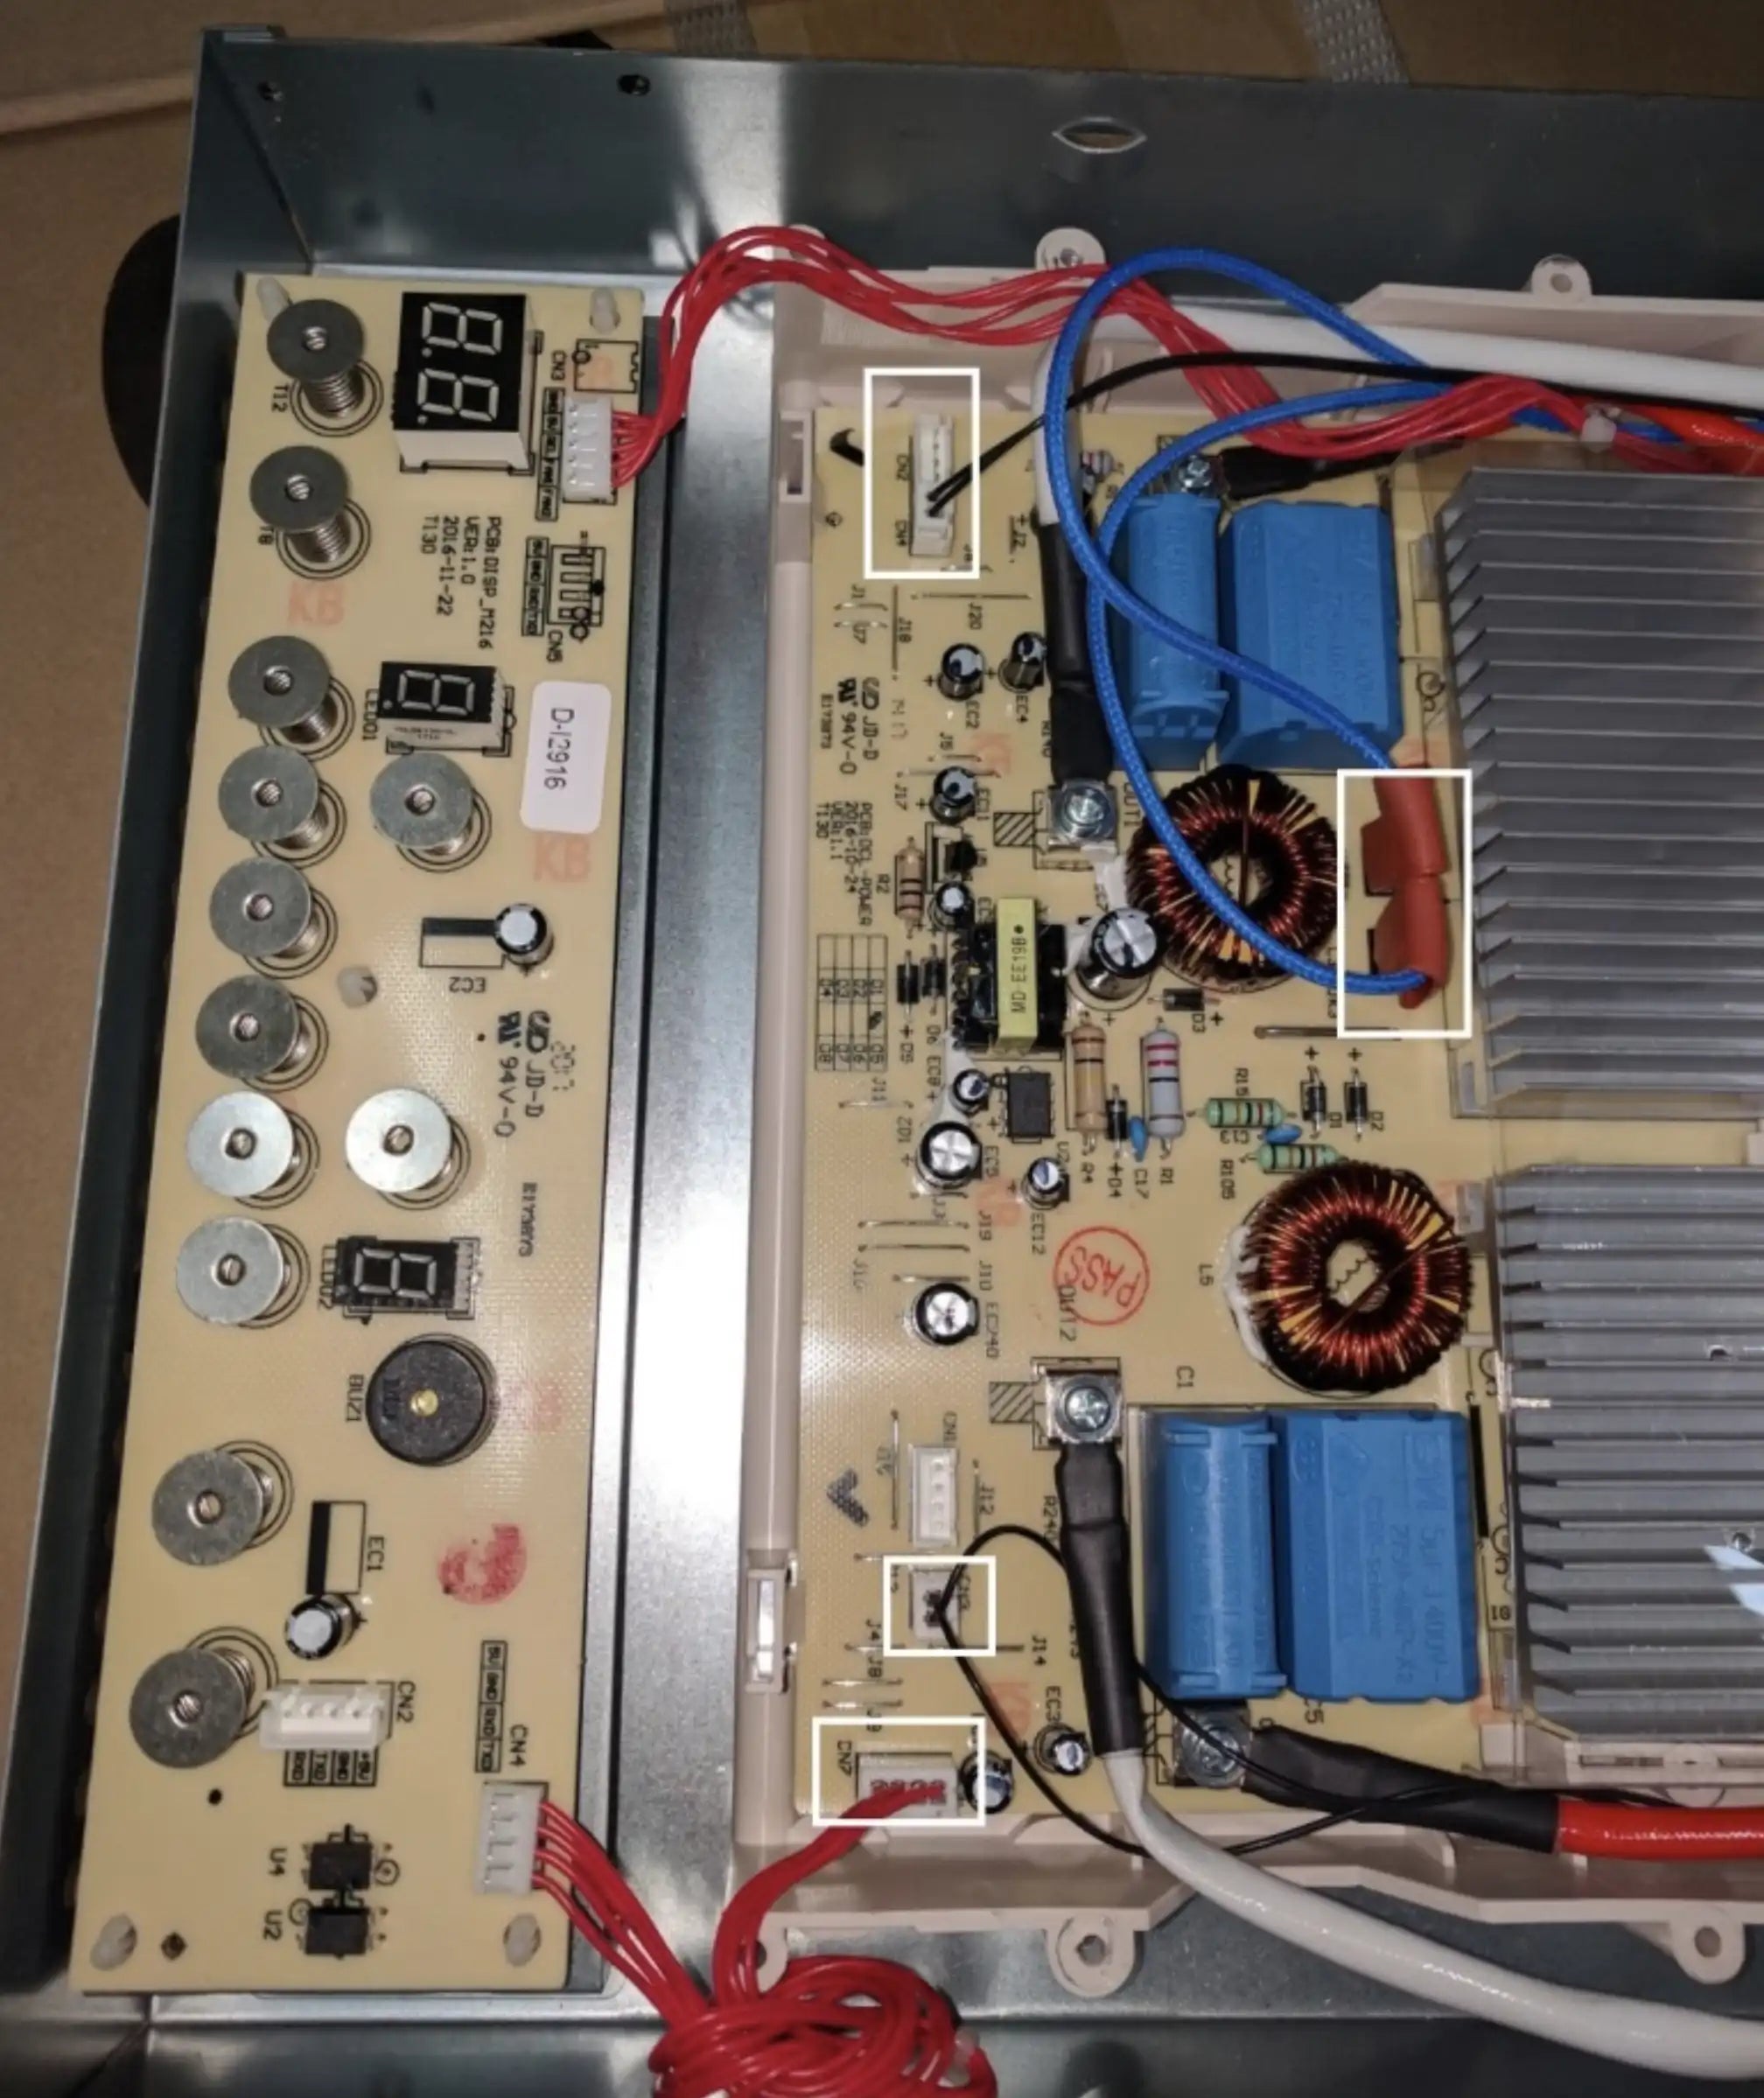
Step 6
Reverse the steps when exchanging to new circuit board.
Circuit Board Replacement (Gas Cooktop)
Step 1:
Remove all grates and burner tops from the cooktop.
Step 2:
Remove all screws and dial knobs indicated in the image below:
NOTE:
Usually, Large burner has 4 screws each, and Medium and Small burners
have 2 screws each to secure them; Also, Dial Knob can be easily removed
by pulling them.
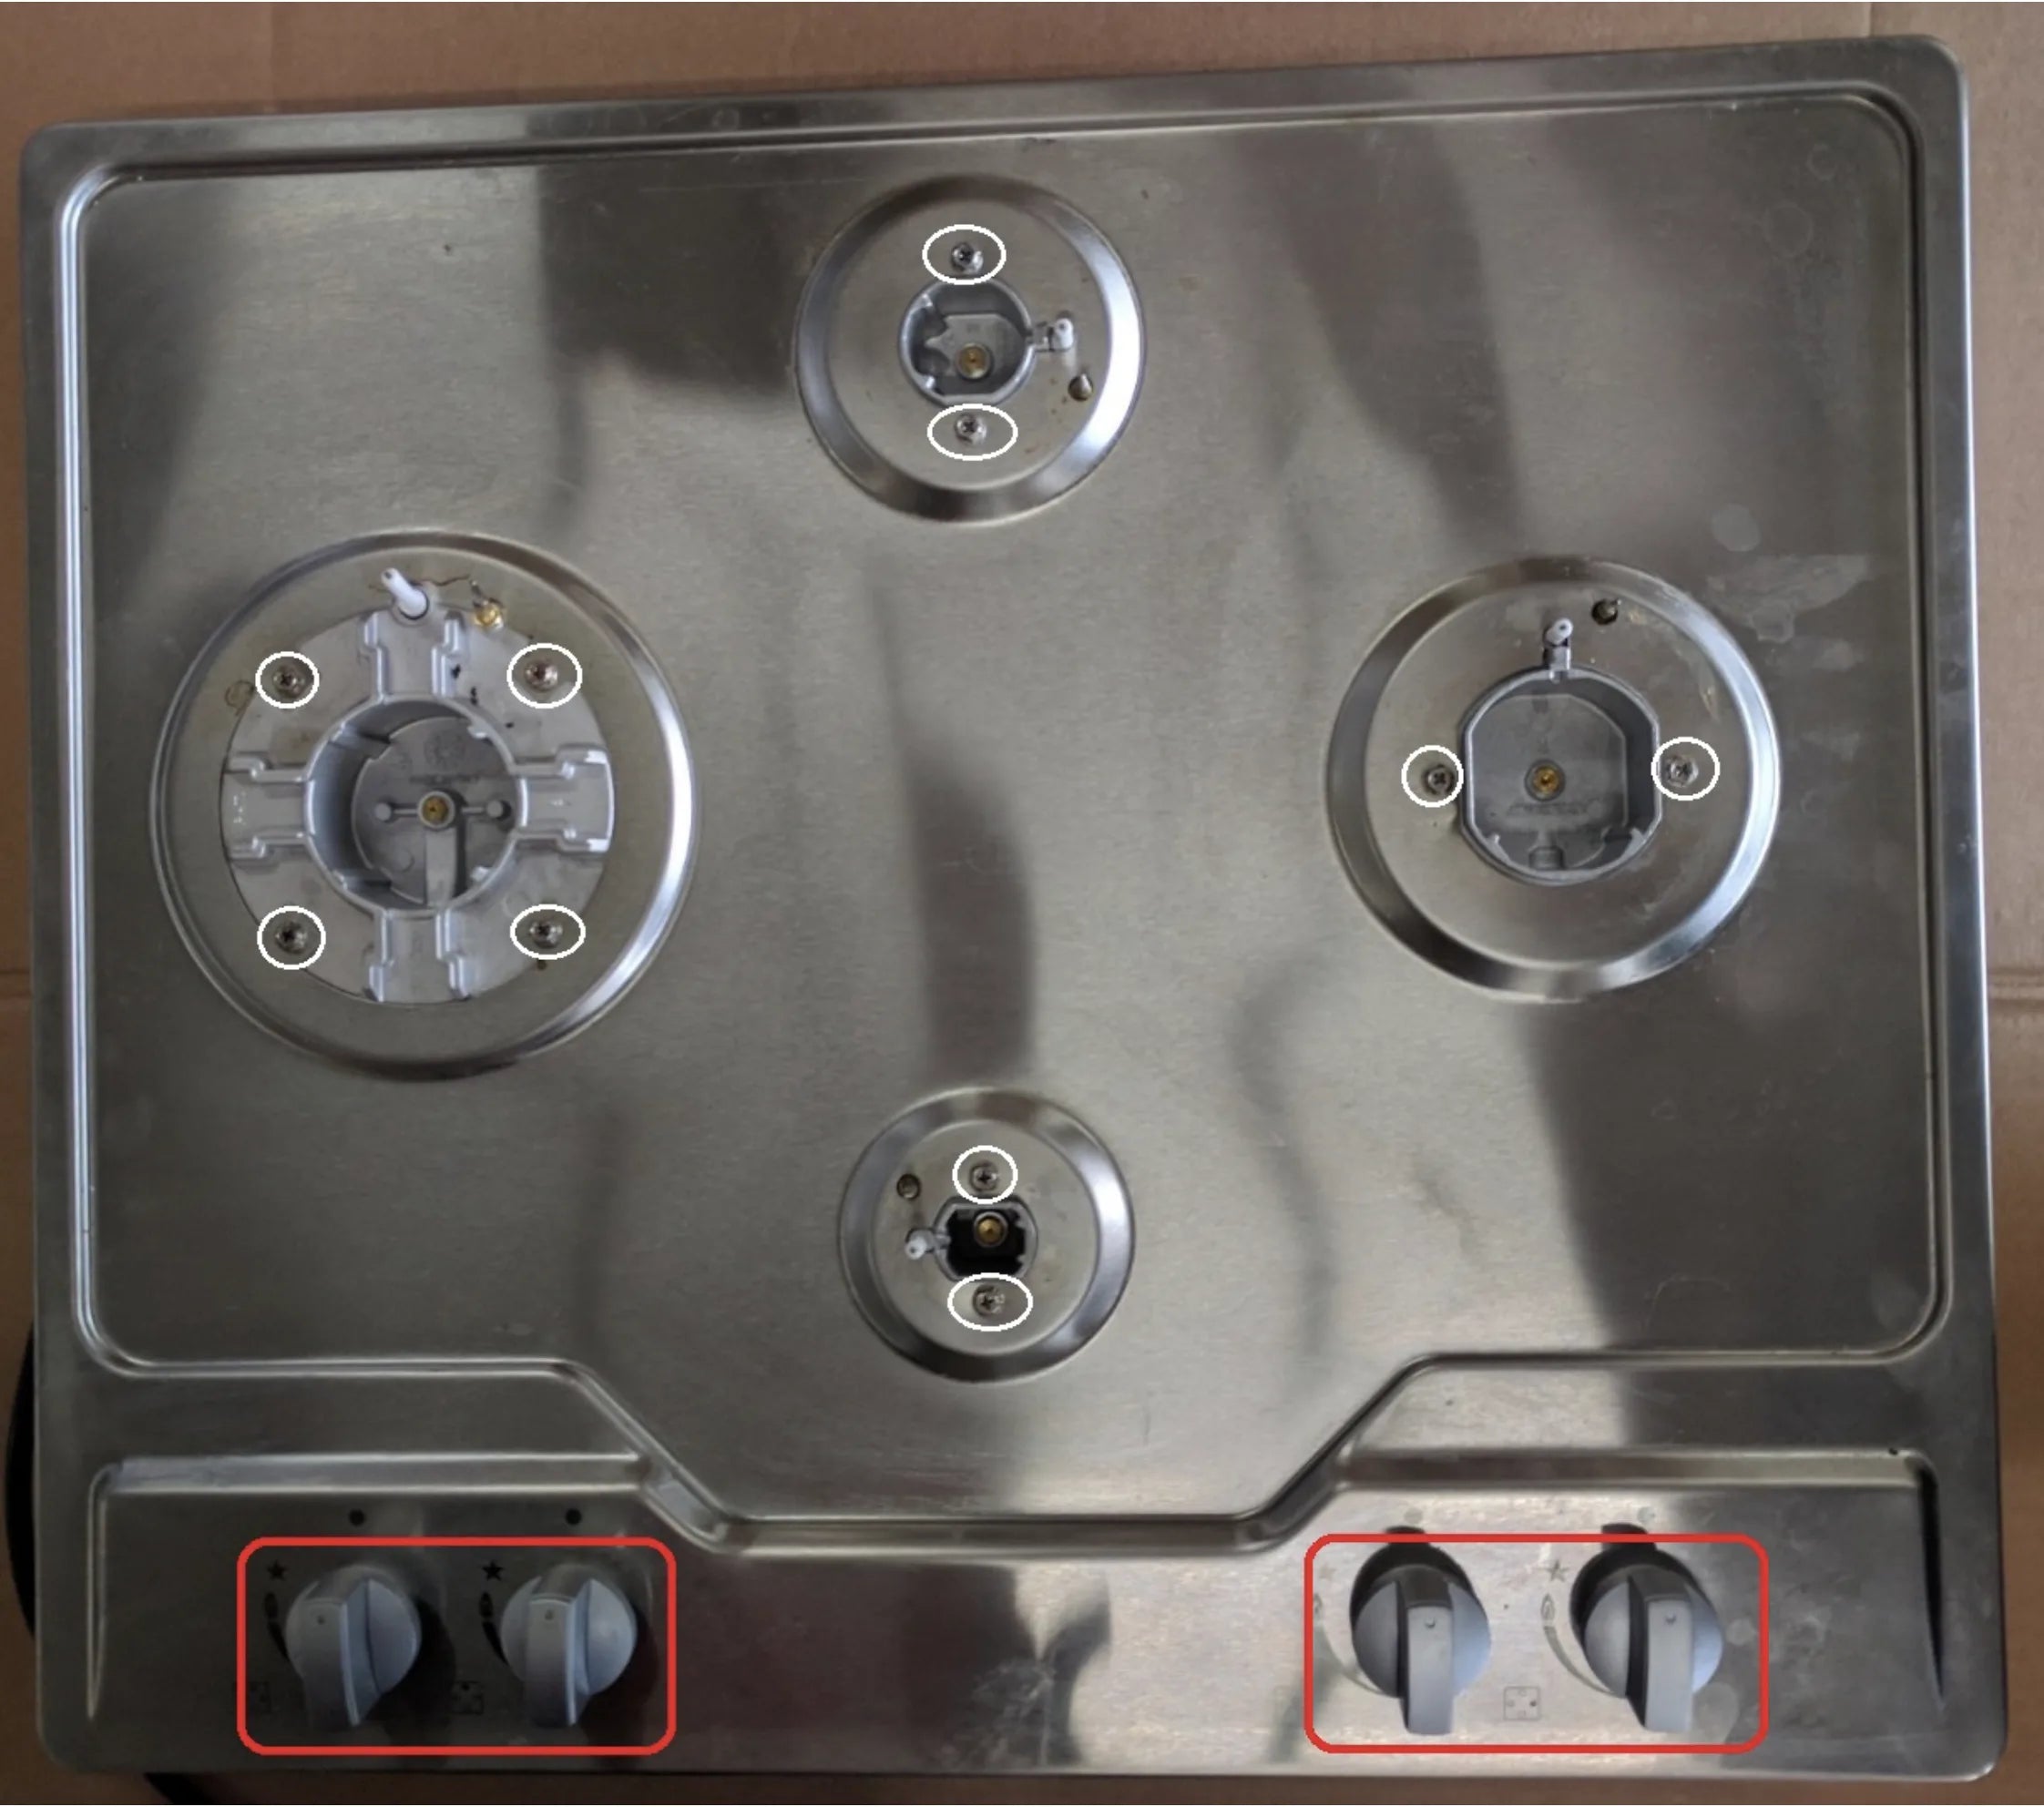
Step 3:
You cooktop should be similar to below image after you removed all screws and dial knobs
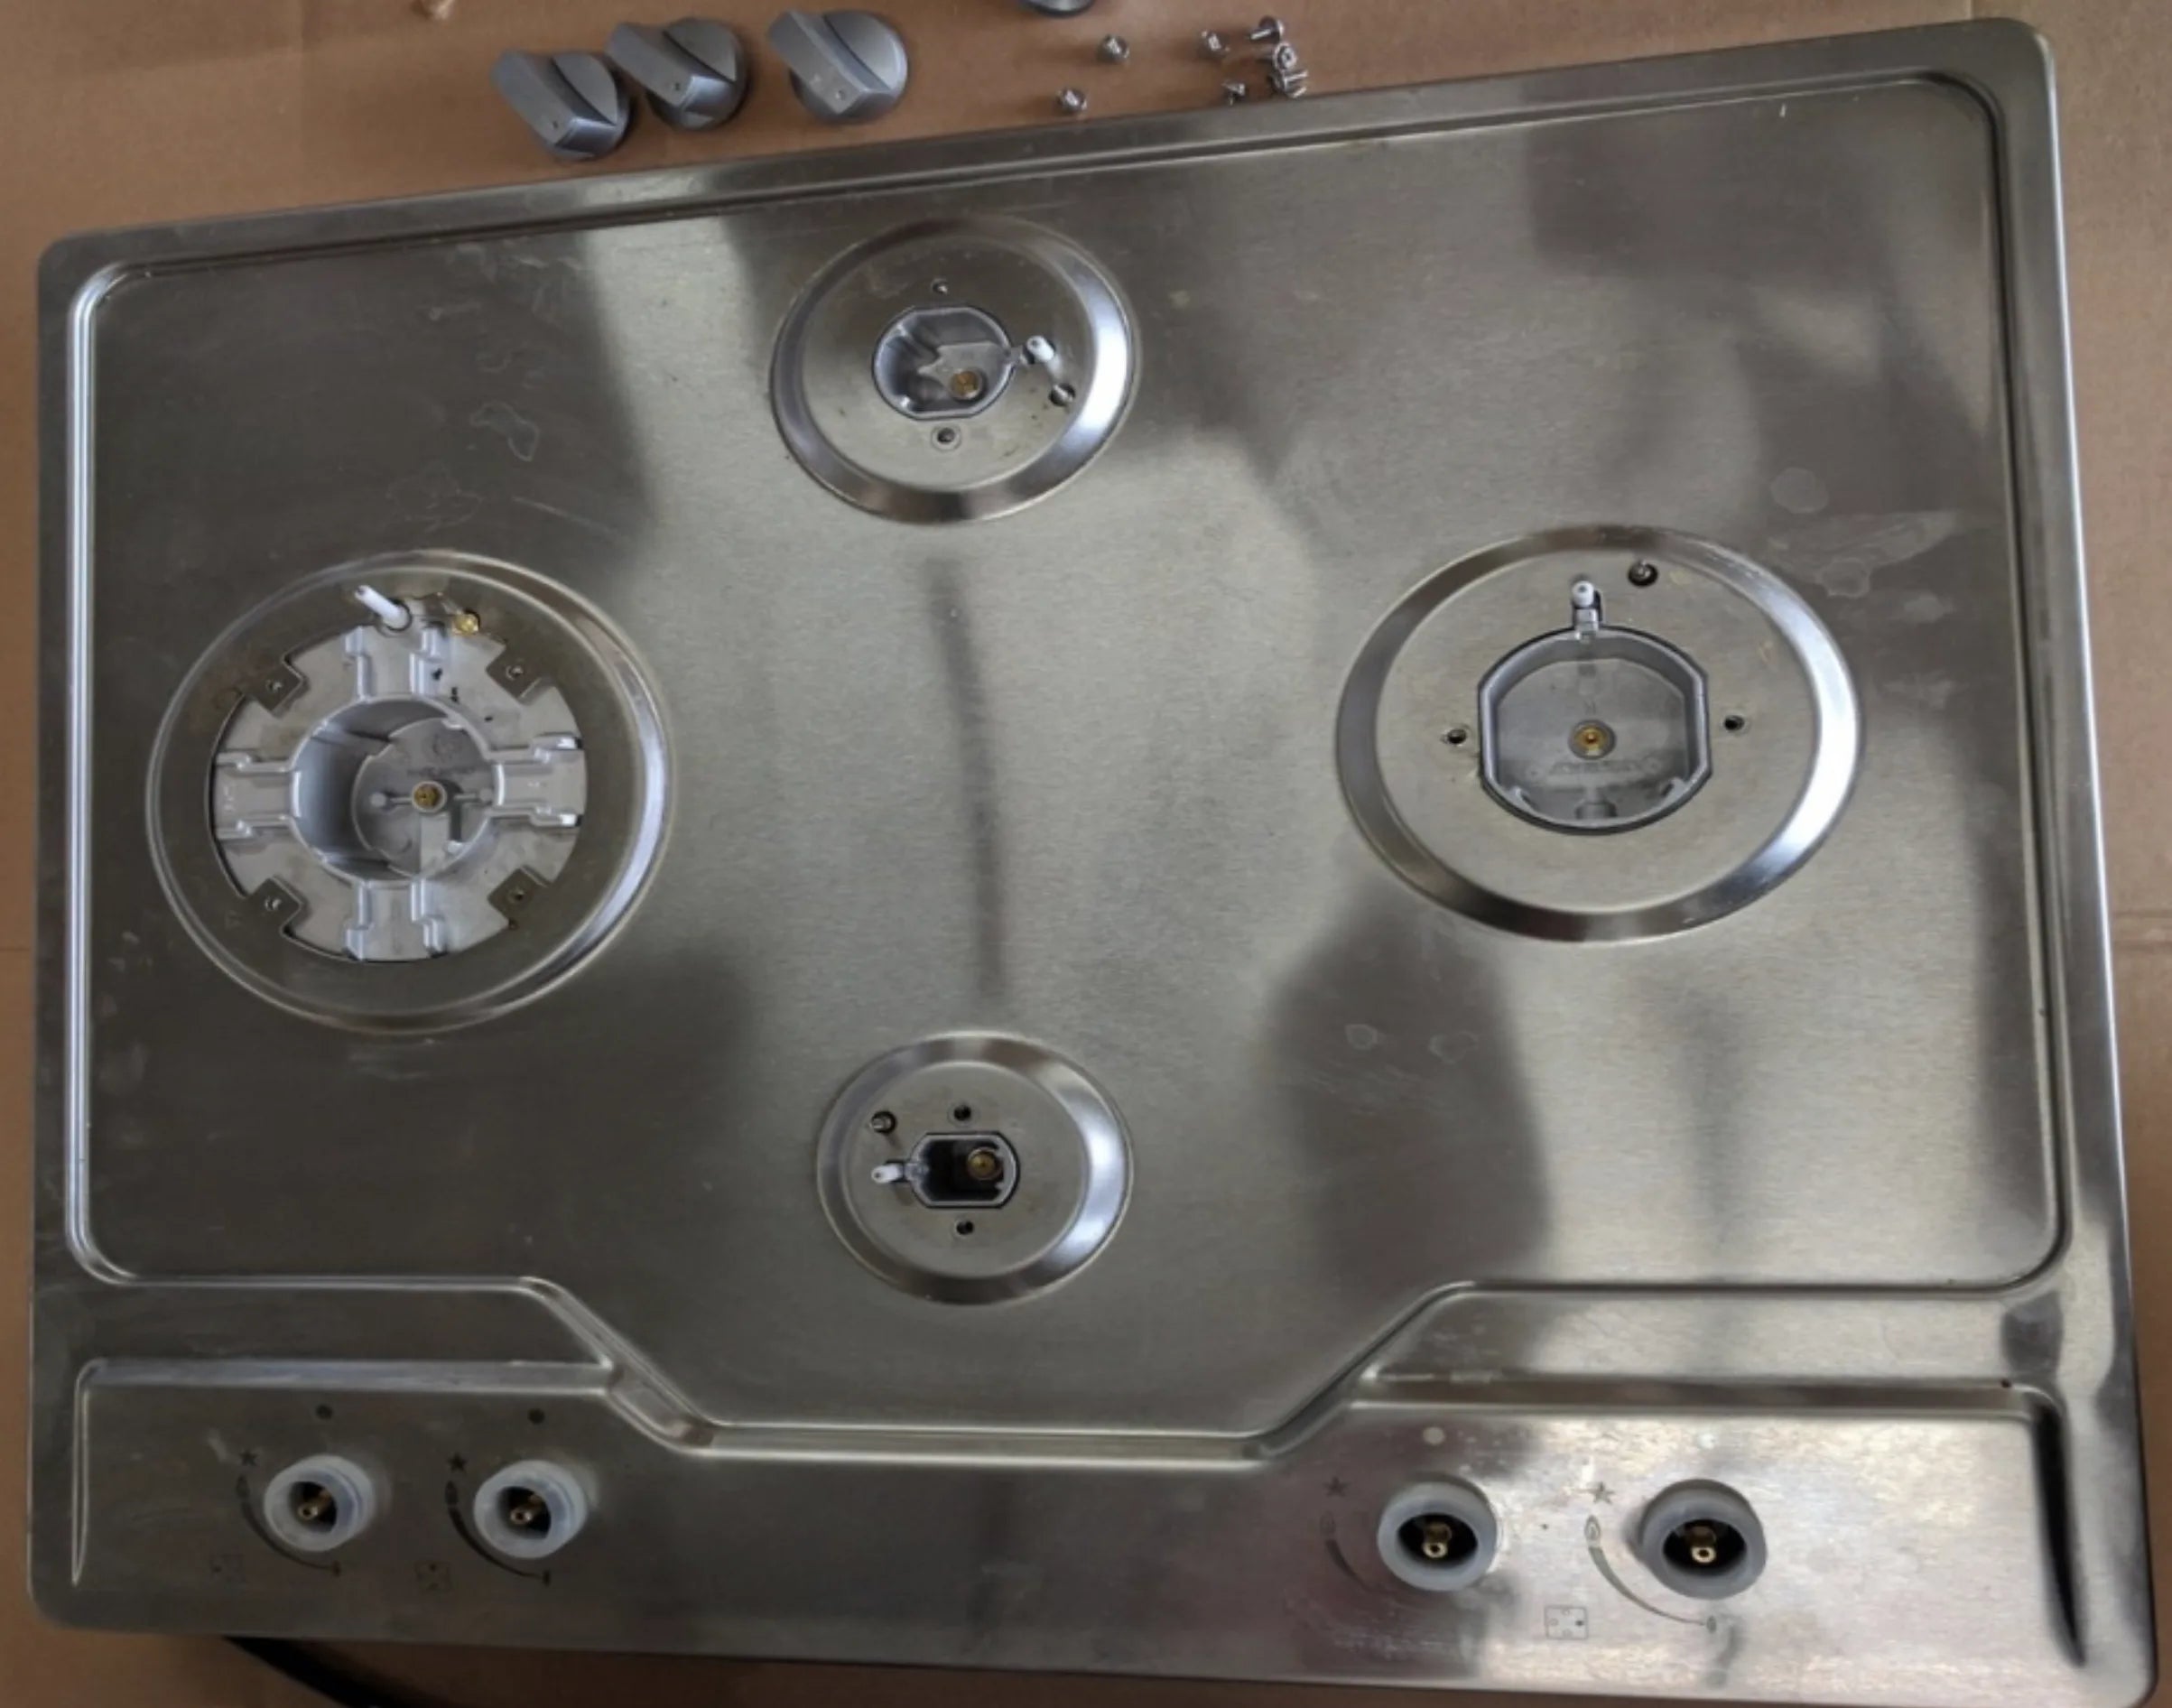
Step 4:
Gently lift up the cover, and you will see the circuit board indicated by the rectangle in below image:
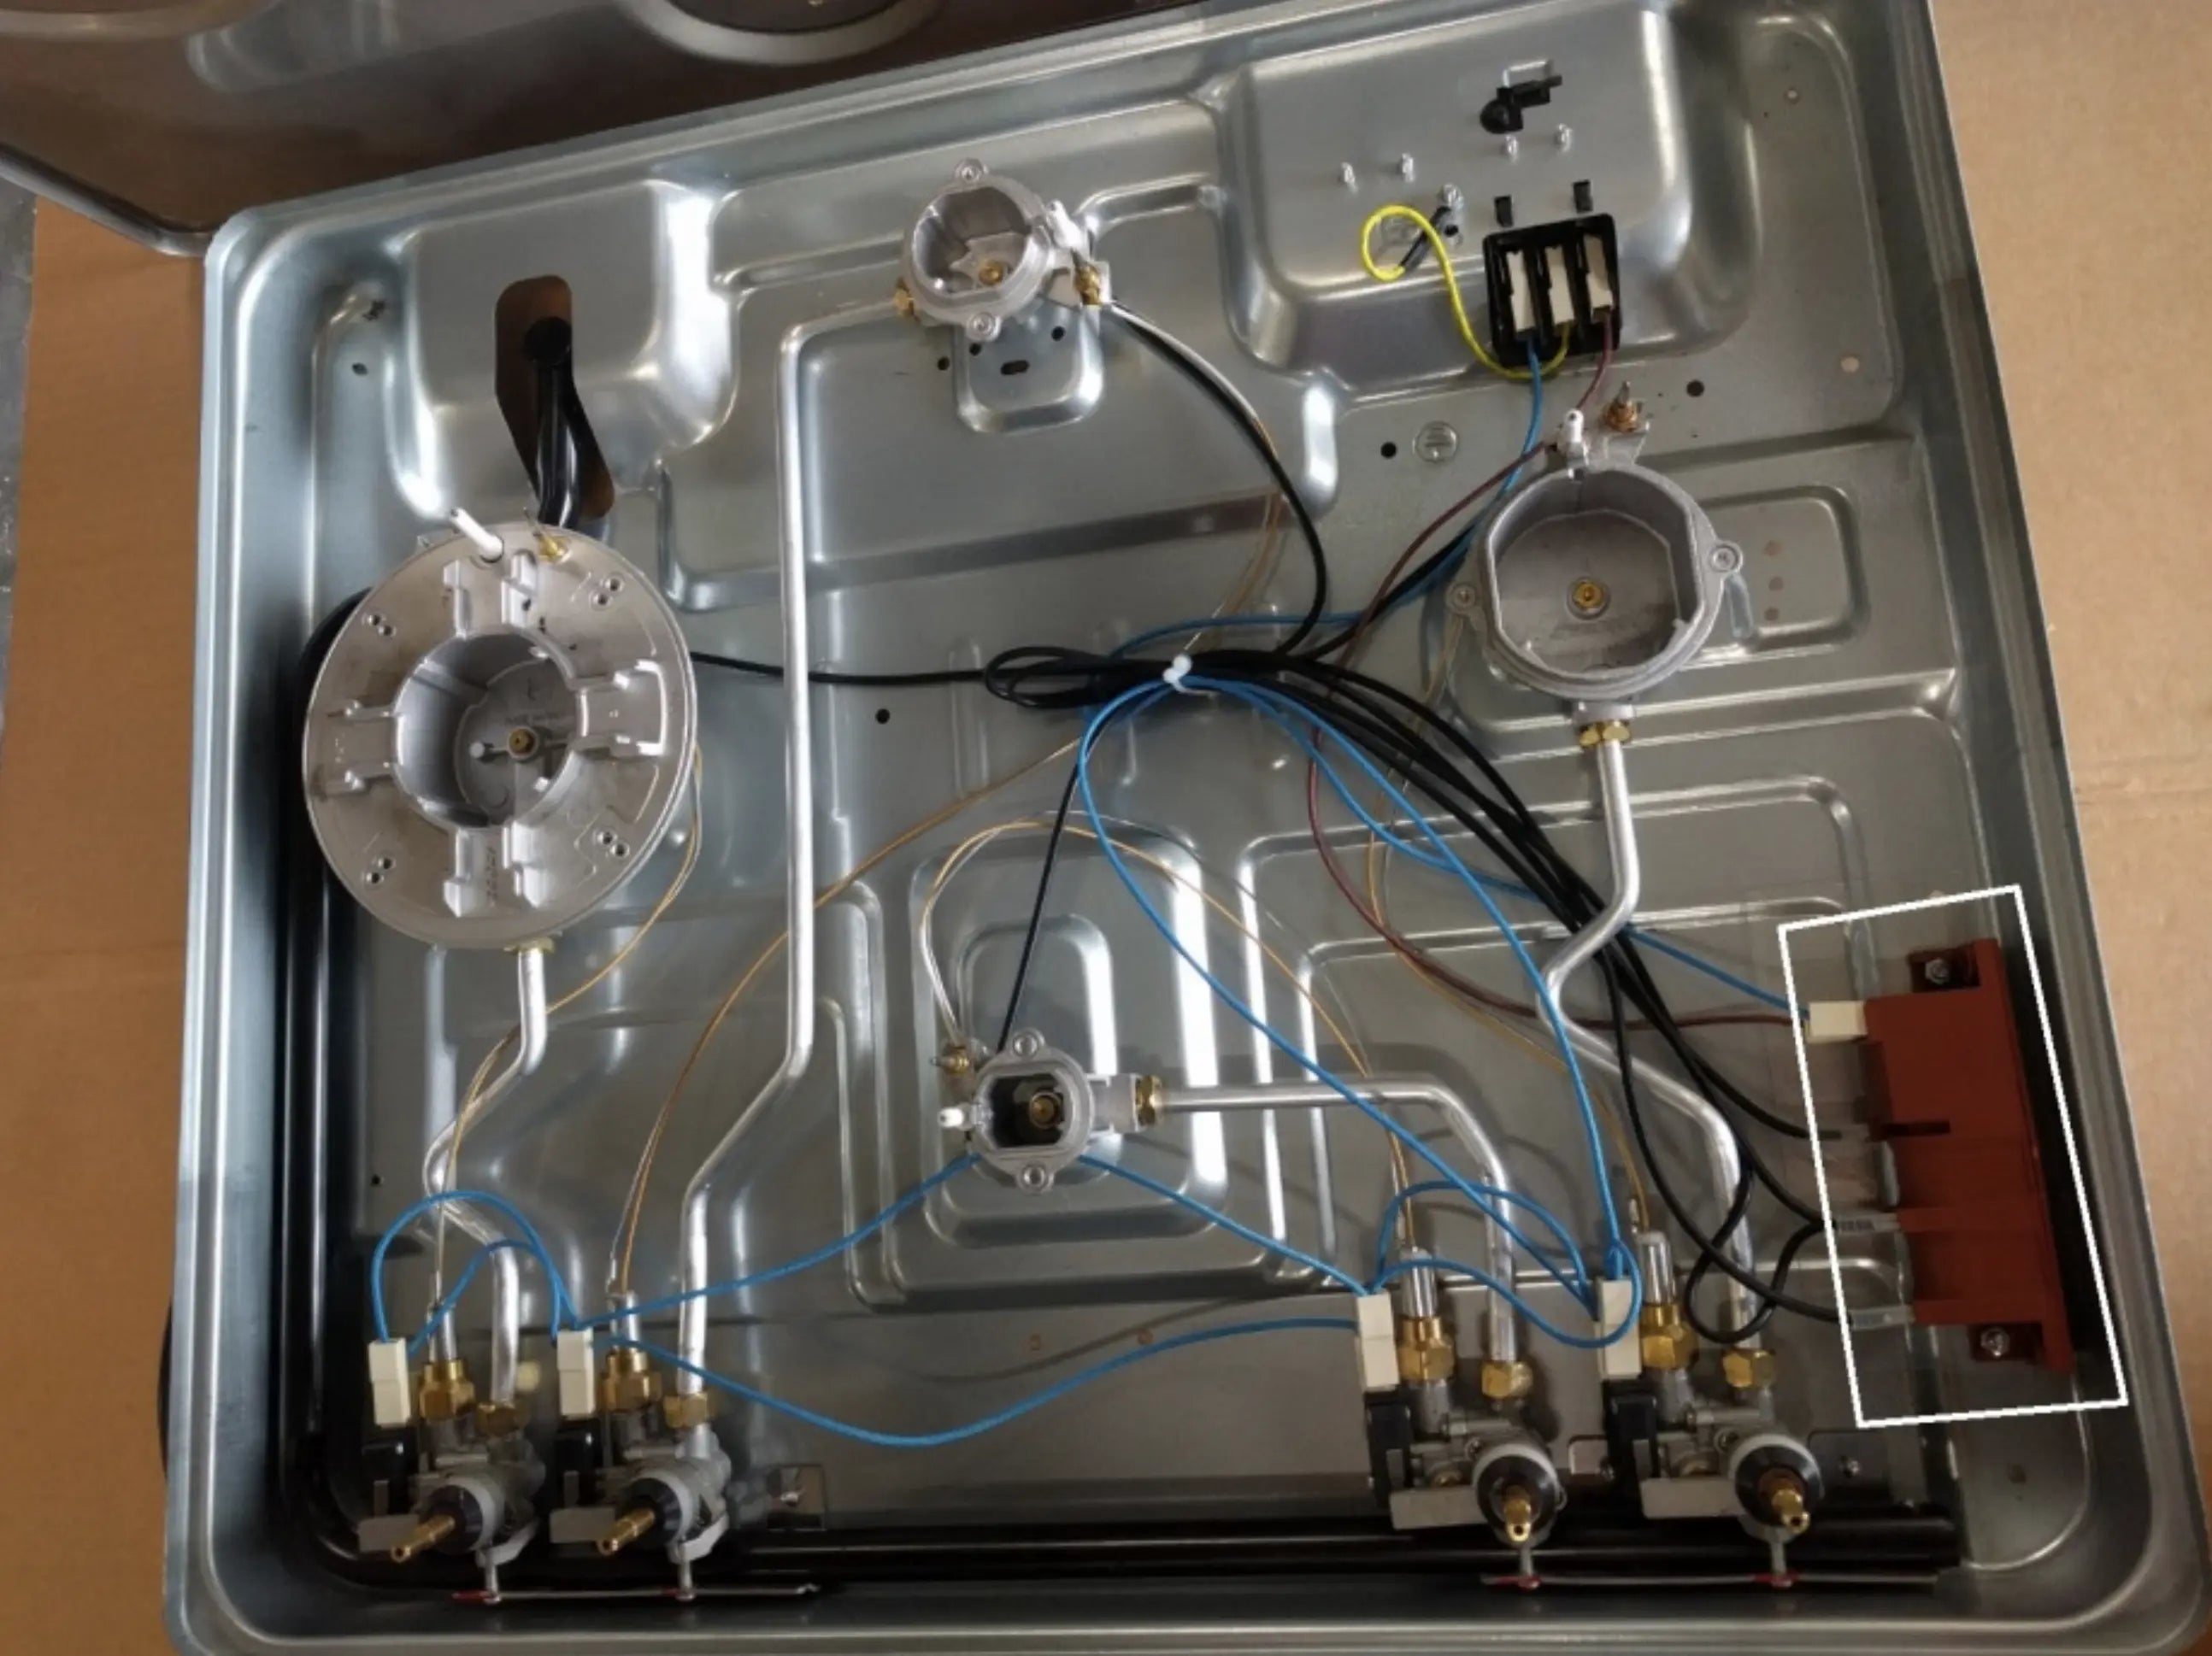
Step 5:
Unscrew the screws on each side of the circuit board and unplug all connection as indicated in below image:
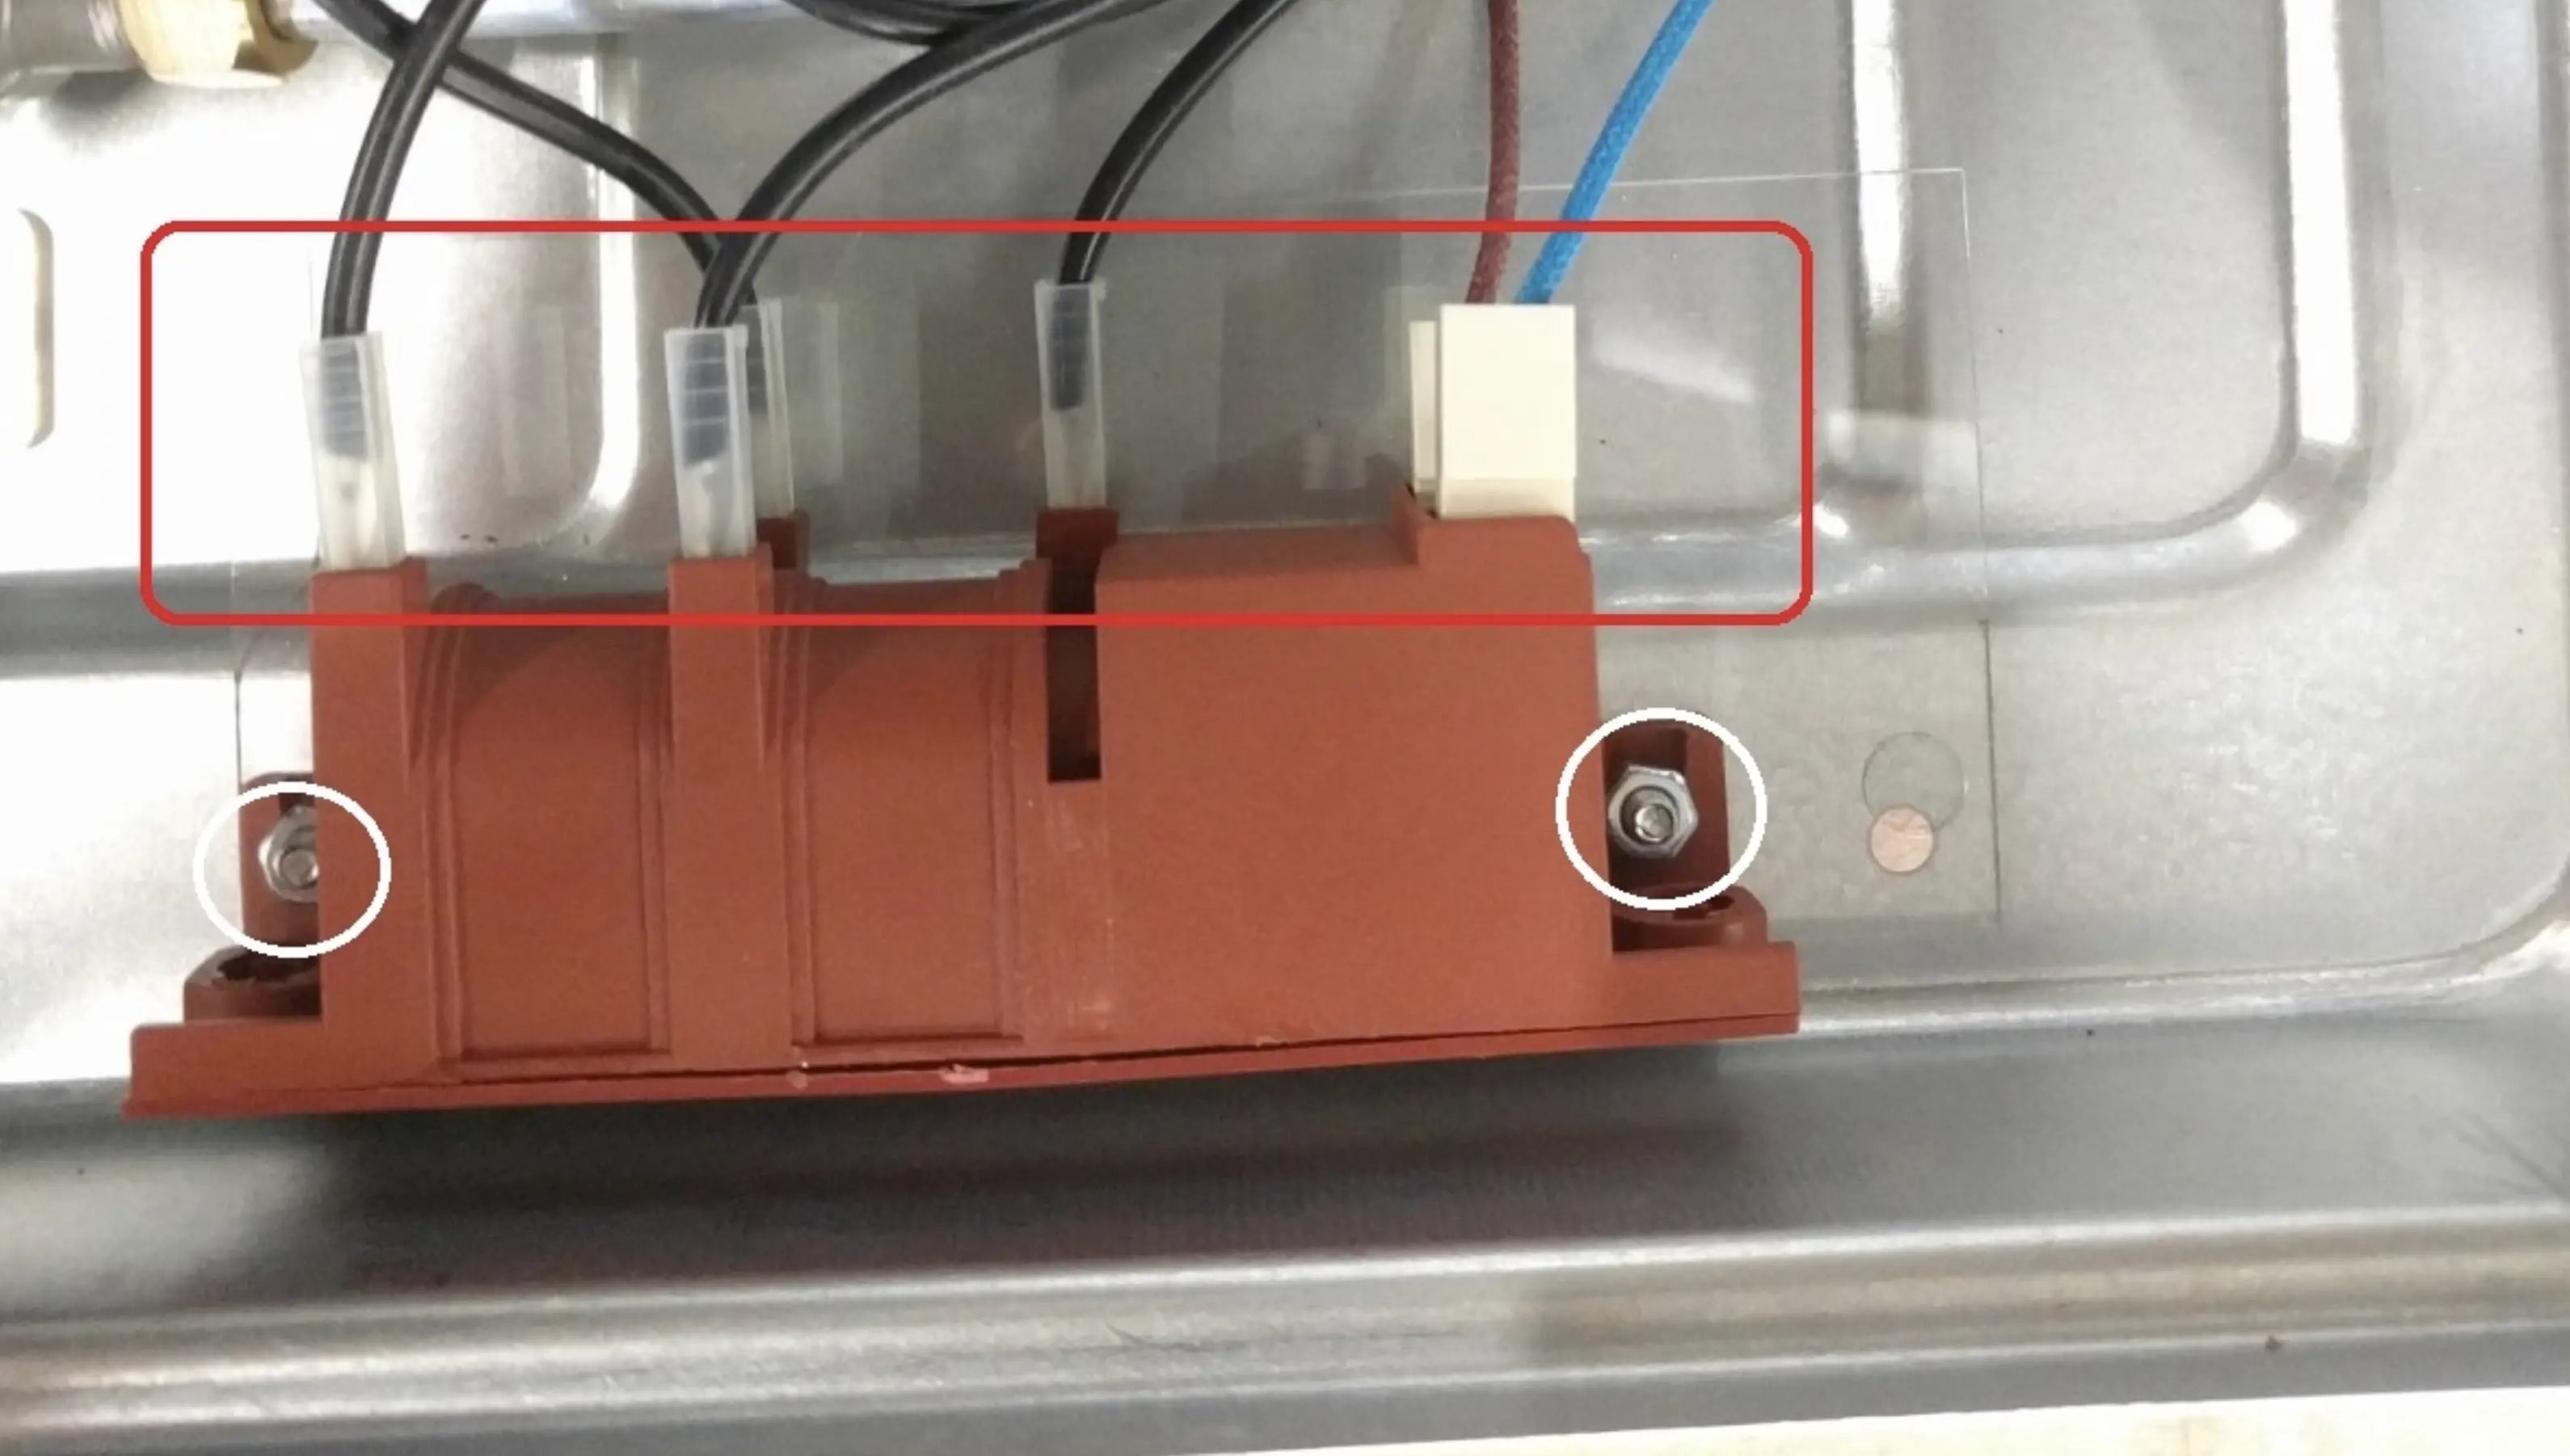
Step 6:
Reverse the steps to finish replacing the circuit board.
Additional Note: This Replacement Instruction Applies to All Models/Sizes of Gas Cooktop
This article contains the following topics:
1.1 Heating Panel Does not work
1.2 Media Panel Does not work (Some or all of the media function doesn't work)
Note: Always consult with Supervisor before sending anything other than the replacement part
1.1 Heating Panel Does not work
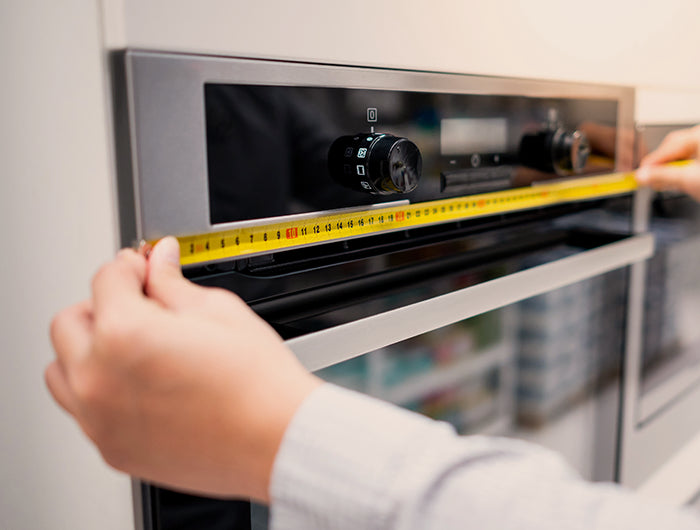
Have customer measure the dimension of the heating panel

1.2 Media Panel Does not work (Some or all of the media function doesn't work)

This article contains the following topics:
1.1 Massage Jet Doesn't Work
1.2 Leaking from Drainage/Pipe/Overflow
1.1 Massage Jet Doesn't Work
Case by Case Solution
1.2 Leaking from Drainage/Pipe/Overflow
Have Cust. send an image of where the leak is for us to confirm
Send Replacement Drainage, Pipe, or Overflow as needed
This article contains the following topics:
1.1 Leaking from Drainage/Pipe/Overflow
1.2 Looking for "Other" Finished Drain and Overflow
1.1 Leaking from Drainage/Pipe/Overflow
Have Cust. send the image of where the leak is for us to confirm
Send Replacement Drainage, Pipe, or Overflow as needed
1.2 Looking for "Other" Finished Drain and Overflow
Not Available.
All models (except EMPV-FT1518) by default is Chrome Finish Fixture
This article contains the following topics:
1.1 Gas Leak
1.2 Unable to find correct size adapter 1/2"Female
Note: LPG Nozzle Placement
Largest Burner - 93
Second Largest - 85
Third Largest - 65
Smallest - 50
Oven Top - 78
Oven Bot. - 65
1.1 Gas Leak
If the gas leak is coming from the connection
Make sure the seal is 100% tight.
Could not identify where the leaking is coming from
Send replacement unit TESTED (Must be approved by Supervisor)
1.2 Unable to find correct size adapter 1/2"Female
www.homedepot.com
NG: PSSD-42
LPG: PSSL-15
This article contains the following topics:
- 1.1 Wiring Confusion / Need instruction on wiring
- 1.2 E1 Absence of induction cookware
- 1.3 E2/E3Abnormal supply voltage (Usually due to insufficient power or incorrect 220v setup)
- 1.4 E0/E7/E8/E9/EE
- 1.5 F Communication problem between control panel and burner(s) circuit board
- 1.6 E4/E
- 1.7 Burner Stopped Working / Not working from Beginning
- 1.8 Cannot control the cooktop
- 1.9 "U" Icon Indicating IDC does not detect correct cookware
Note: Make Sure Cust. Is Connecting Using
220v Single
Split-Phase
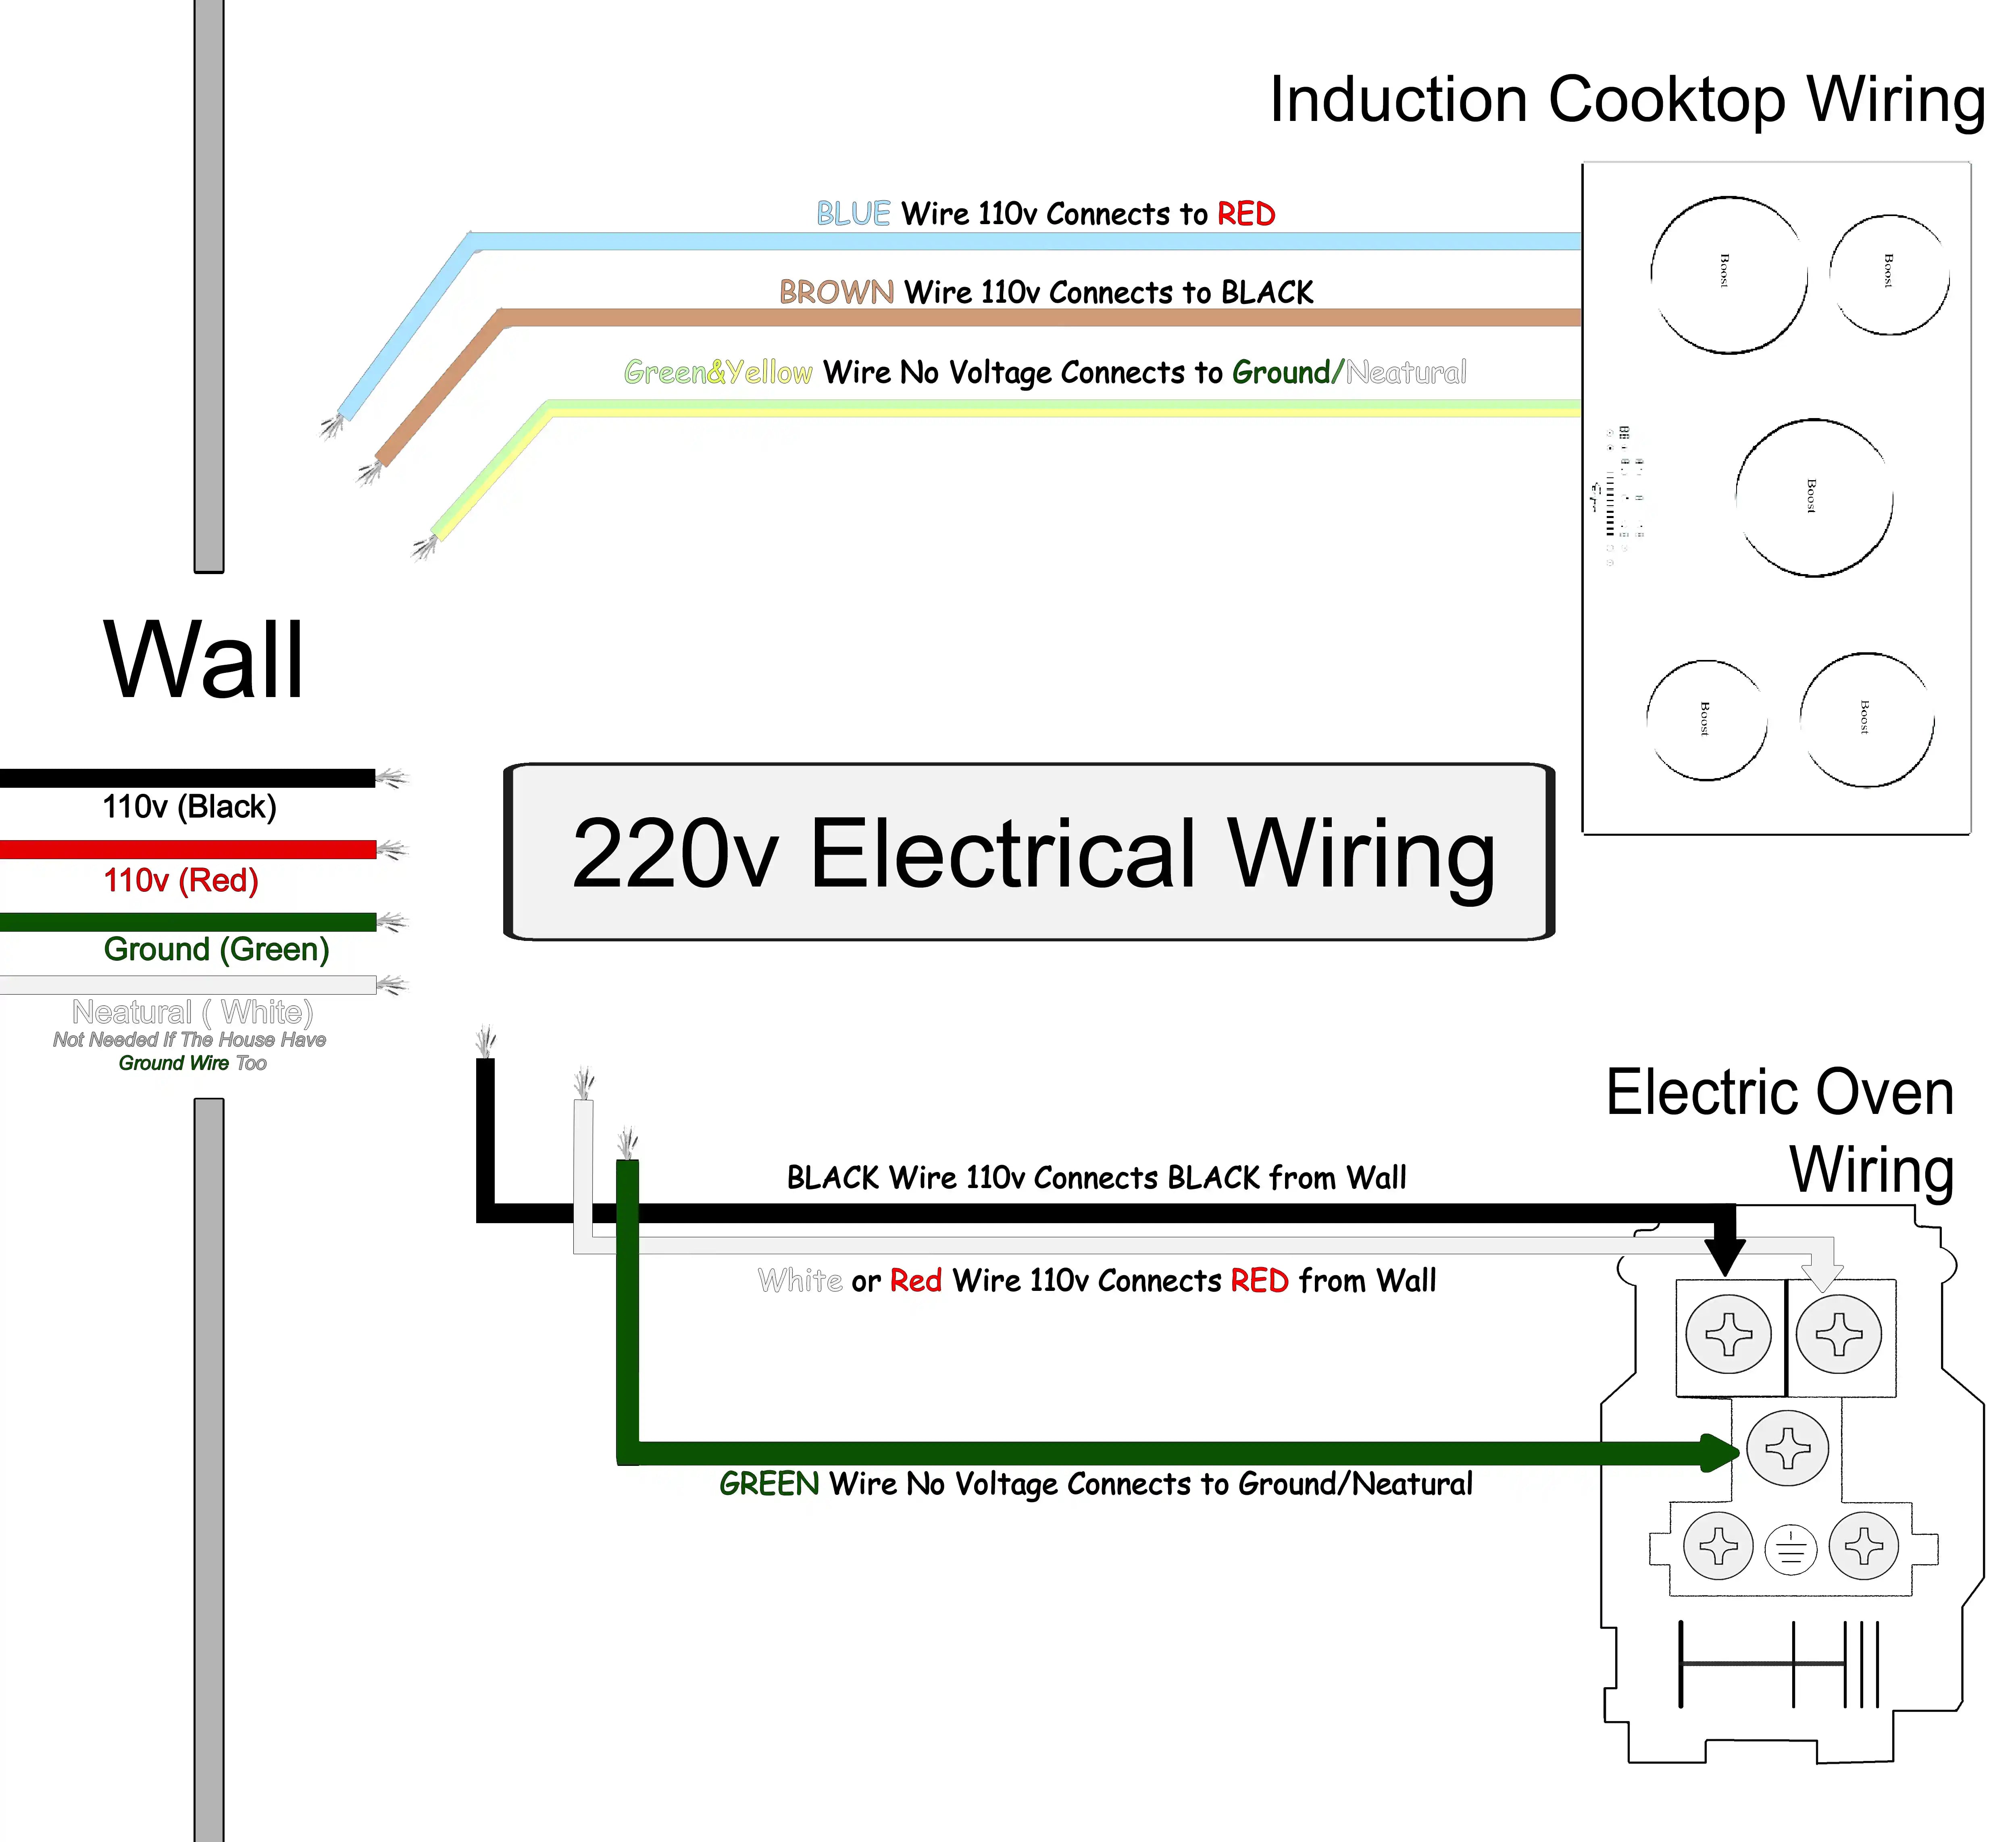
1.1 Wiring Confusion / Need instruction on wiring
Send "220v Electric Oven Wiring Instruction" (Click here for Instruction Link)
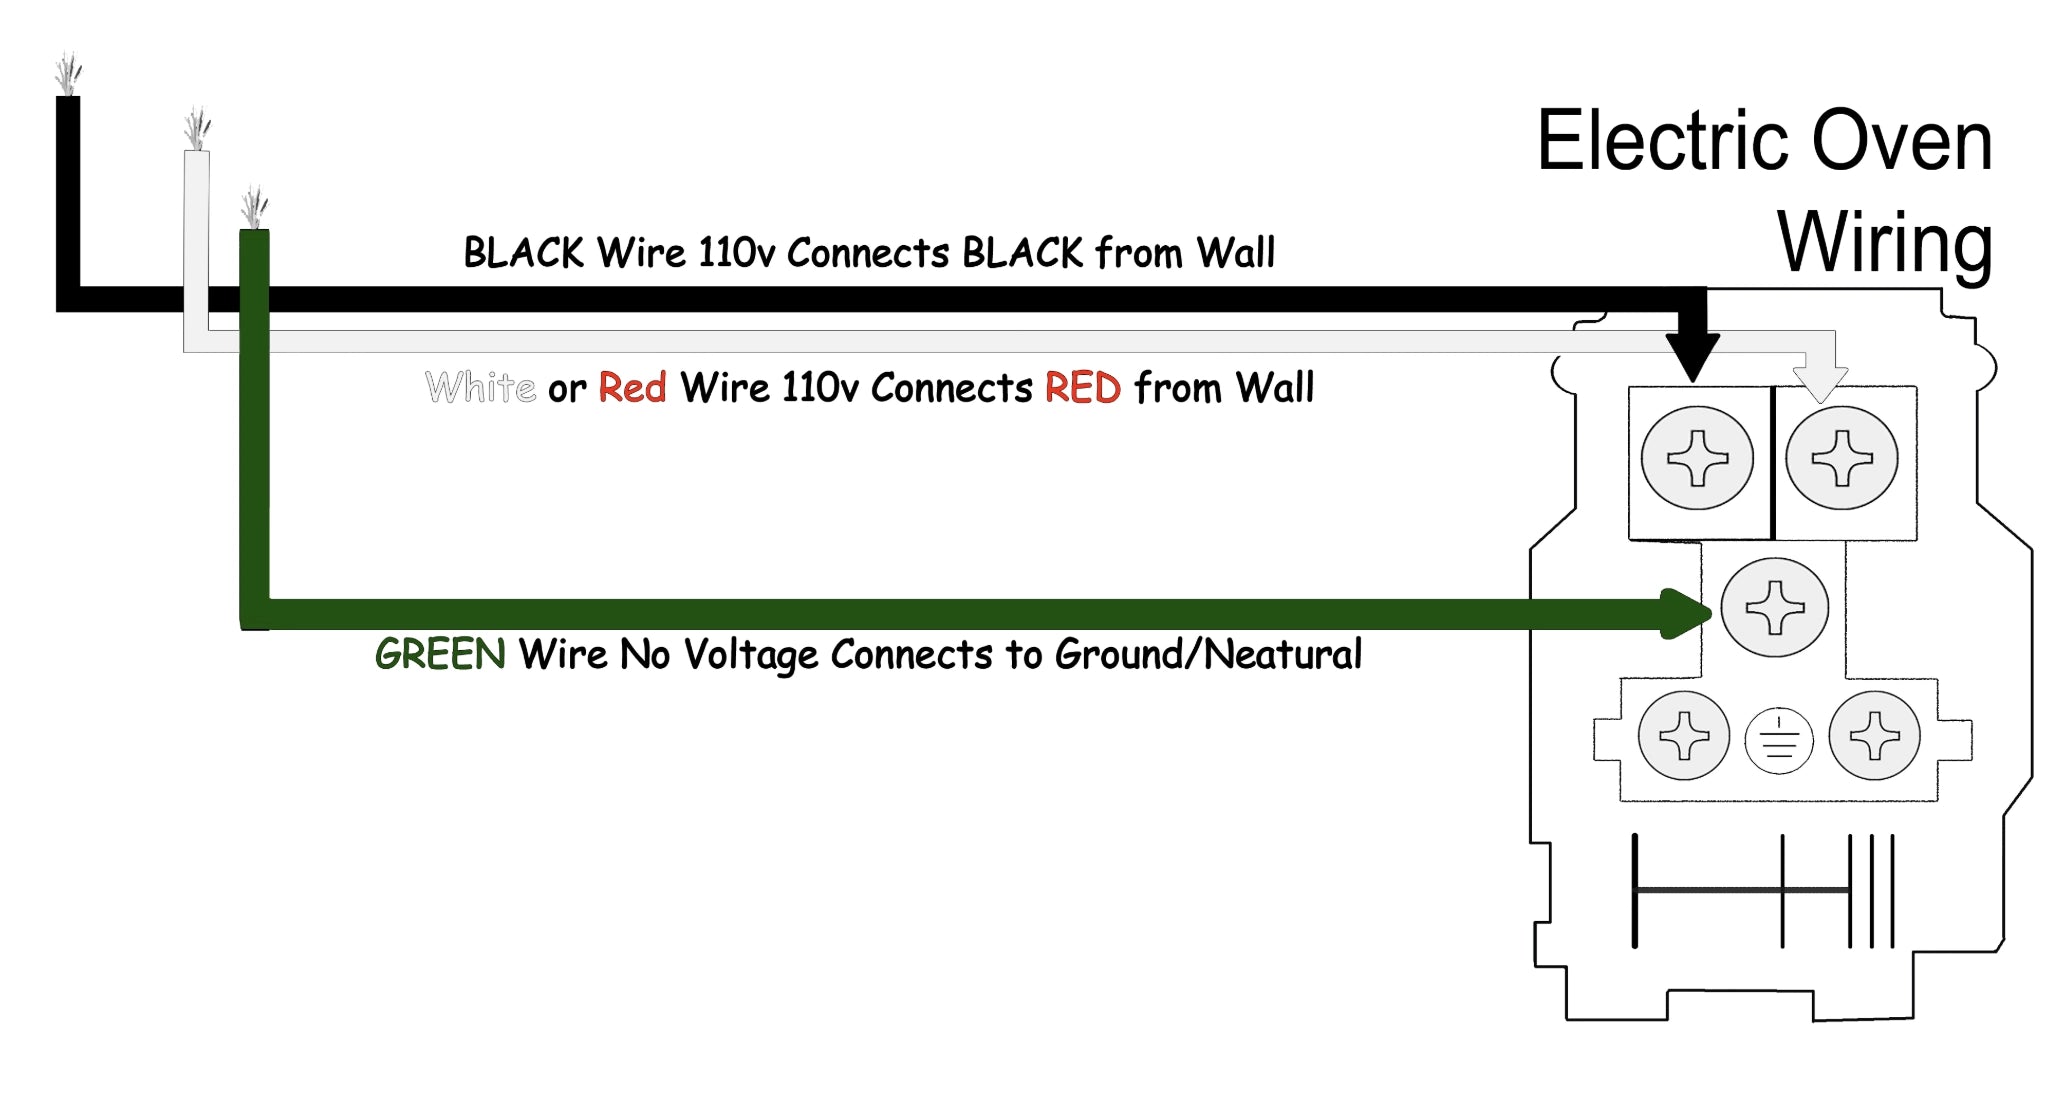
1.2 E1 Absence of induction cookware
Put induction cookware on the burner(s)
1.3 E2/E3Abnormal supply voltage (Usually due to insufficient power or incorrect 220v setup)
Make sure the electrical outlet is set up as
Single Split-Phase 220v
Send Diagram if Needed (Click here for Instruction Link)

1.4 E0/E7/E8/E9/EE
Unplug the unit and reset the breaker.
If not fixed: Replace Circuit Board
1.5 F Communication problem between control panel and burner(s) circuit board
If F appears, ask the customer to check for a loose connection

1.6 E4/E
Replace Entire Unit
1.7 Burner Stopped Working / Not working from Beginning
Restart Cooktop. When restarting, is there a "Beep" sound
If: Yes
Then: Ask customer does the display show anything
If:

When restarting, there is no "Beep" sound
Then: Replace Control Panel AND Both Side Circuit Board (Except for IDC12 which only has 1 Control Panel and Circuit Board)
1.8 Cannot control the cooktop
Ask customer: Does the digital display have a "LO" Message (Locked Touch Screen)
If: Yes

If: No
Restart The Cooktop
If: Not Fixed
Then: Replace Entire Unit
1.9 "U" Icon Indicating IDC does not detect correct cookware
Customer using Induction Cookware
Then Have they put any food or liquid inside the pot for testing? (The pot must have something inside)
If: Yes
Restart the cooktop, then separately with each burner
Ask Customer: Is the issue still present to any of the burners?
If Yes, Replace Entire Unit
If: No
Make sure there is food or water in the pot and restart from Column 2 if the issue is still present.
Customer not using Induction Cookware
Induction Cookware is required. Test the unit after switching to Induction Cookware
This article contains the following topics:
- 1.1 Burner does not light up
- 1.2 All burners keep igniting (For as long as it connects to power)
Note: Always Collect Info. On Cust.'s Fuel Source (LPG or NG) First
LPG Nozzle Placement
Largest Burner - 93
Second Largest - 85
Third Largest - 65 x2(1)
Smallest - 50
1.1 Burner does not light up


1.2 All burners keep igniting (For as long as it connects to power)
All burners keep igniting (For as long as it connects to power)
Send Troubleshooting Video: Click here for Video Link
If: Not Fixed / Cust. Is not willing to Fix
Then: Replacement Entire Unit
This article contains the following topics:
- 1.1 Burner does not light up
- 1.2 Metal Grate does not sit flat
- 1.3 Unable to find correct size adapter 1/2"Female
Note: Always Collect Info. On Cust.'s Fuel Source (LPG or NG) First
LPG Nozzle Placement
Largest Burner - 93
Second Largest - 85
Third Largest - 65 x2(1)
Smallest - 50
1.1 Burner does not light up


1.2 Metal Grate does not sit flat
Send images
Consult with Supervisor
1.3 Unable to find correct size adapter 1/2"Female
www.homedepot.com
NG: PSSD-42
LPG: PSSL-15
This article contains the following topics:
- 1.1 Hard to Ignite / Cannot Ignite
- 1.2 Flame does not stay on / Does not keep lit
- 1.3 Unable to find correct size adapter 1/2"Female
Note:
Always Collect Info. On Cust.'s Fuel Source (LPG or NG) First LPG
Nozzle Placement
Top Burner - 65
Bot. Burner - 78
1.1 Hard to Ignite / Cannot Ignite
Press and Hold the Ignition for 20 seconds
If Not fixed: Replace Oven Main Unit (without the door)
1.2 Flame does not stay on / Does not keep lit
Press and Hold the Ignition for 20 seconds
If Not fixed:
Make sure there is enough airflow space under the oven
Note:
To see if there is enough airflow:
1. After the flame went out, open the oven door, and let it sit for 5-10 mins, then restart the oven.
2. If the oven can be restart after cooling down, turn it off, and drag
the entire oven out of the cabinet for 2-3 inches, then restart the
oven. Make sure the door is closed at the time.
3. If after dragging out the oven, the flame is sustainable and will not go out, then it is 100% airflow problem.
If: Enough Airflow.
Then: Replace Oven Main Unit (without the door)
If: Not Enough Airflow
Then: Send Airflow Requirement Illustration
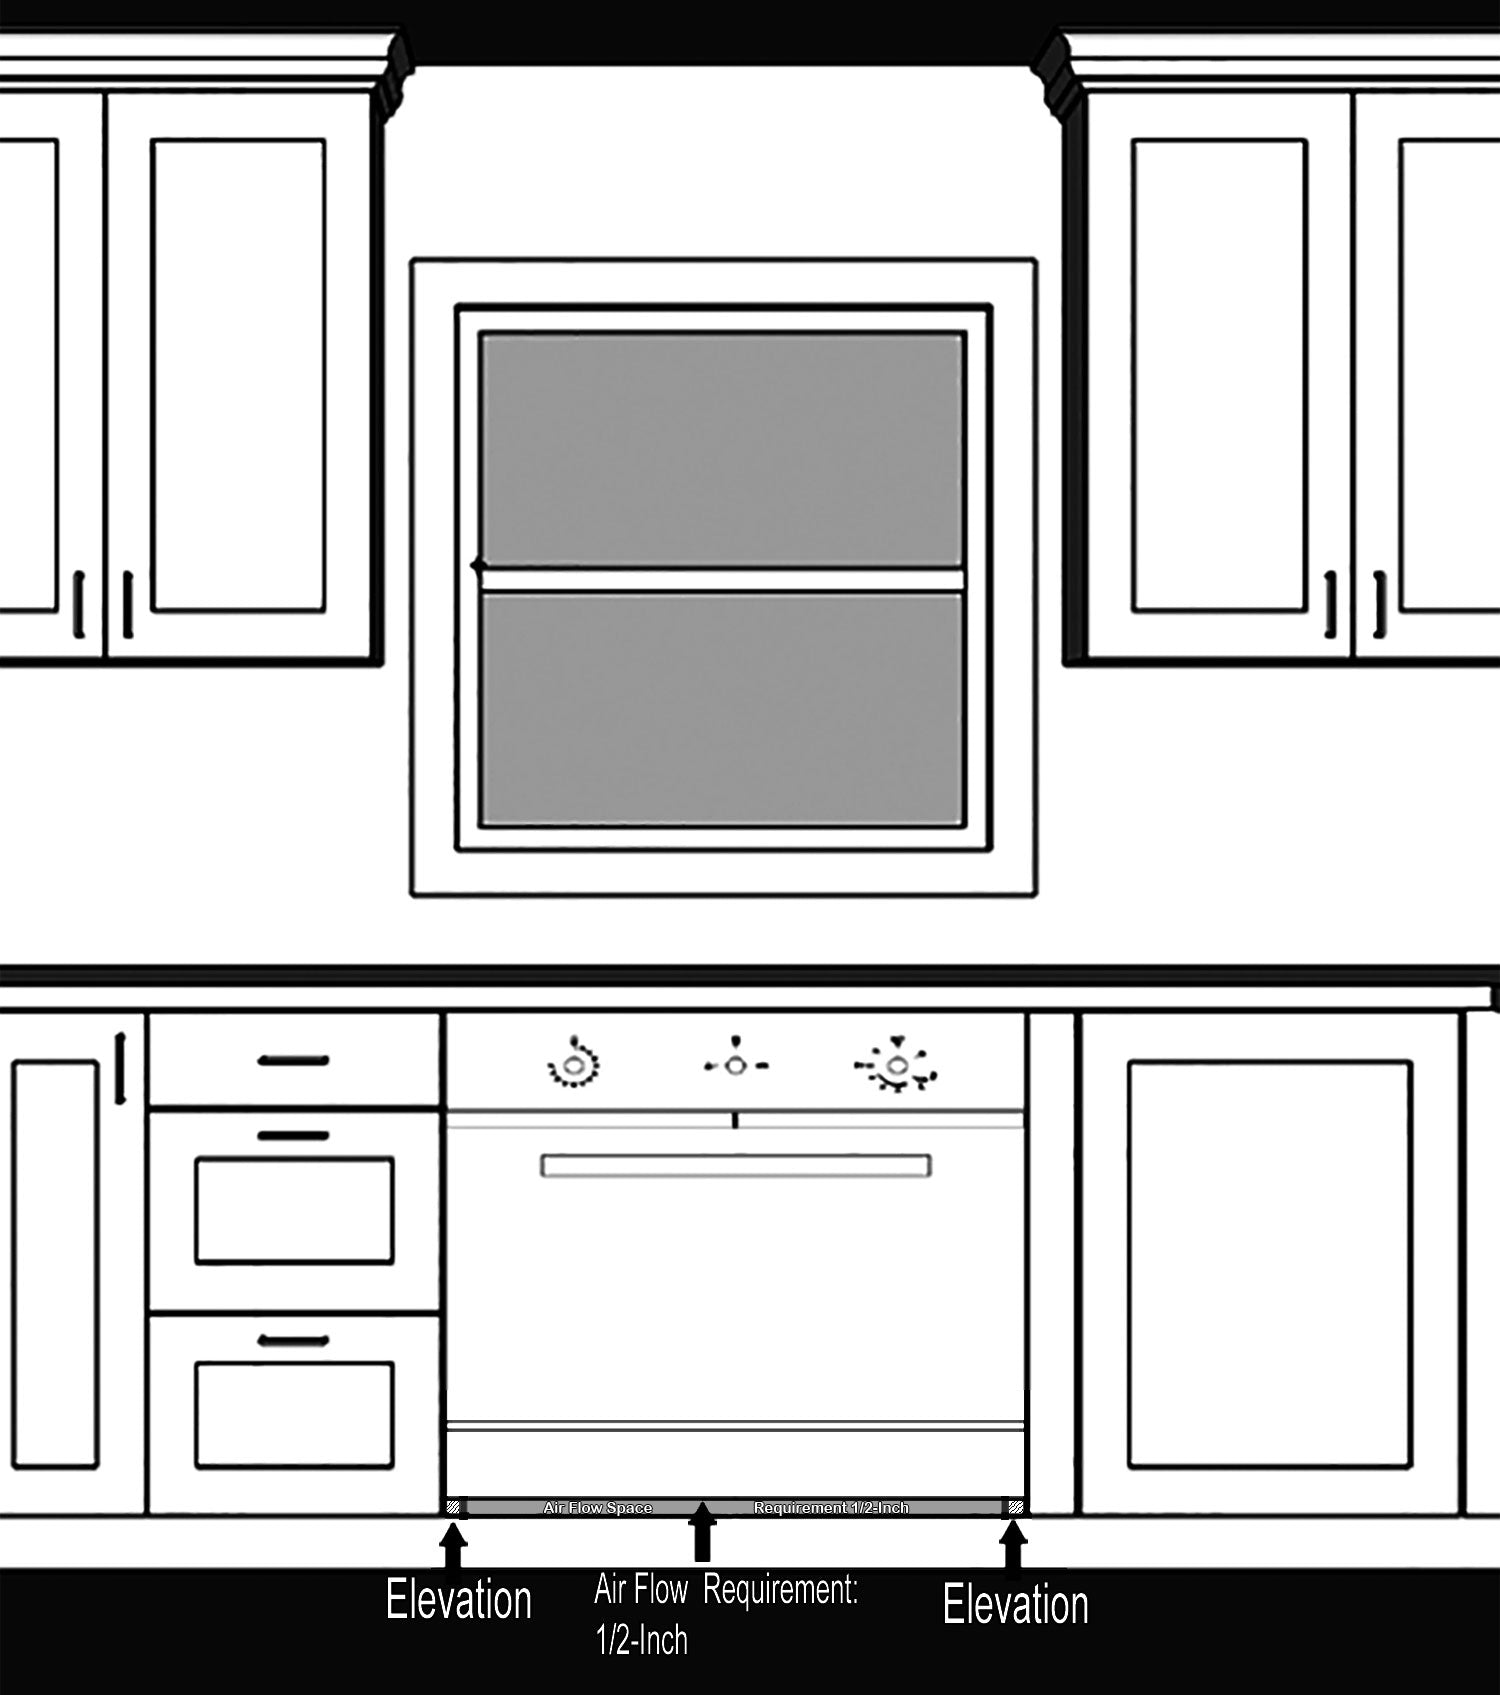
1.3 Unable to find correct size adapter 1/2"Female
www.homedepot.com
Natural Gas: PSSD-42
Liquid Propane Gas: PSSL-15
This article contains the following topics:
- 1.1 The oven does not heat up (To the desired Temperature)
- 1.2 Touch Screen Does not Turn on OR does not turn on at all.
- 1.3 Touchscreen's Temperature display inaccurate
- 1.4 Wiring Instruction/Confusion
- 1.5 E1 Error Code (Requires Replacement "White Cable")
- 1.6 Changing Display Temperature from °C or °F (Vice Versa) Touchscreen model only.
- 1.7 The Oven cannot be turned on
Note: Always Make Sure Cust. Wire the Electric Oven Using 220v Single Split-Phase.
1.1 The oven does not heat up (To the desired Temperature)
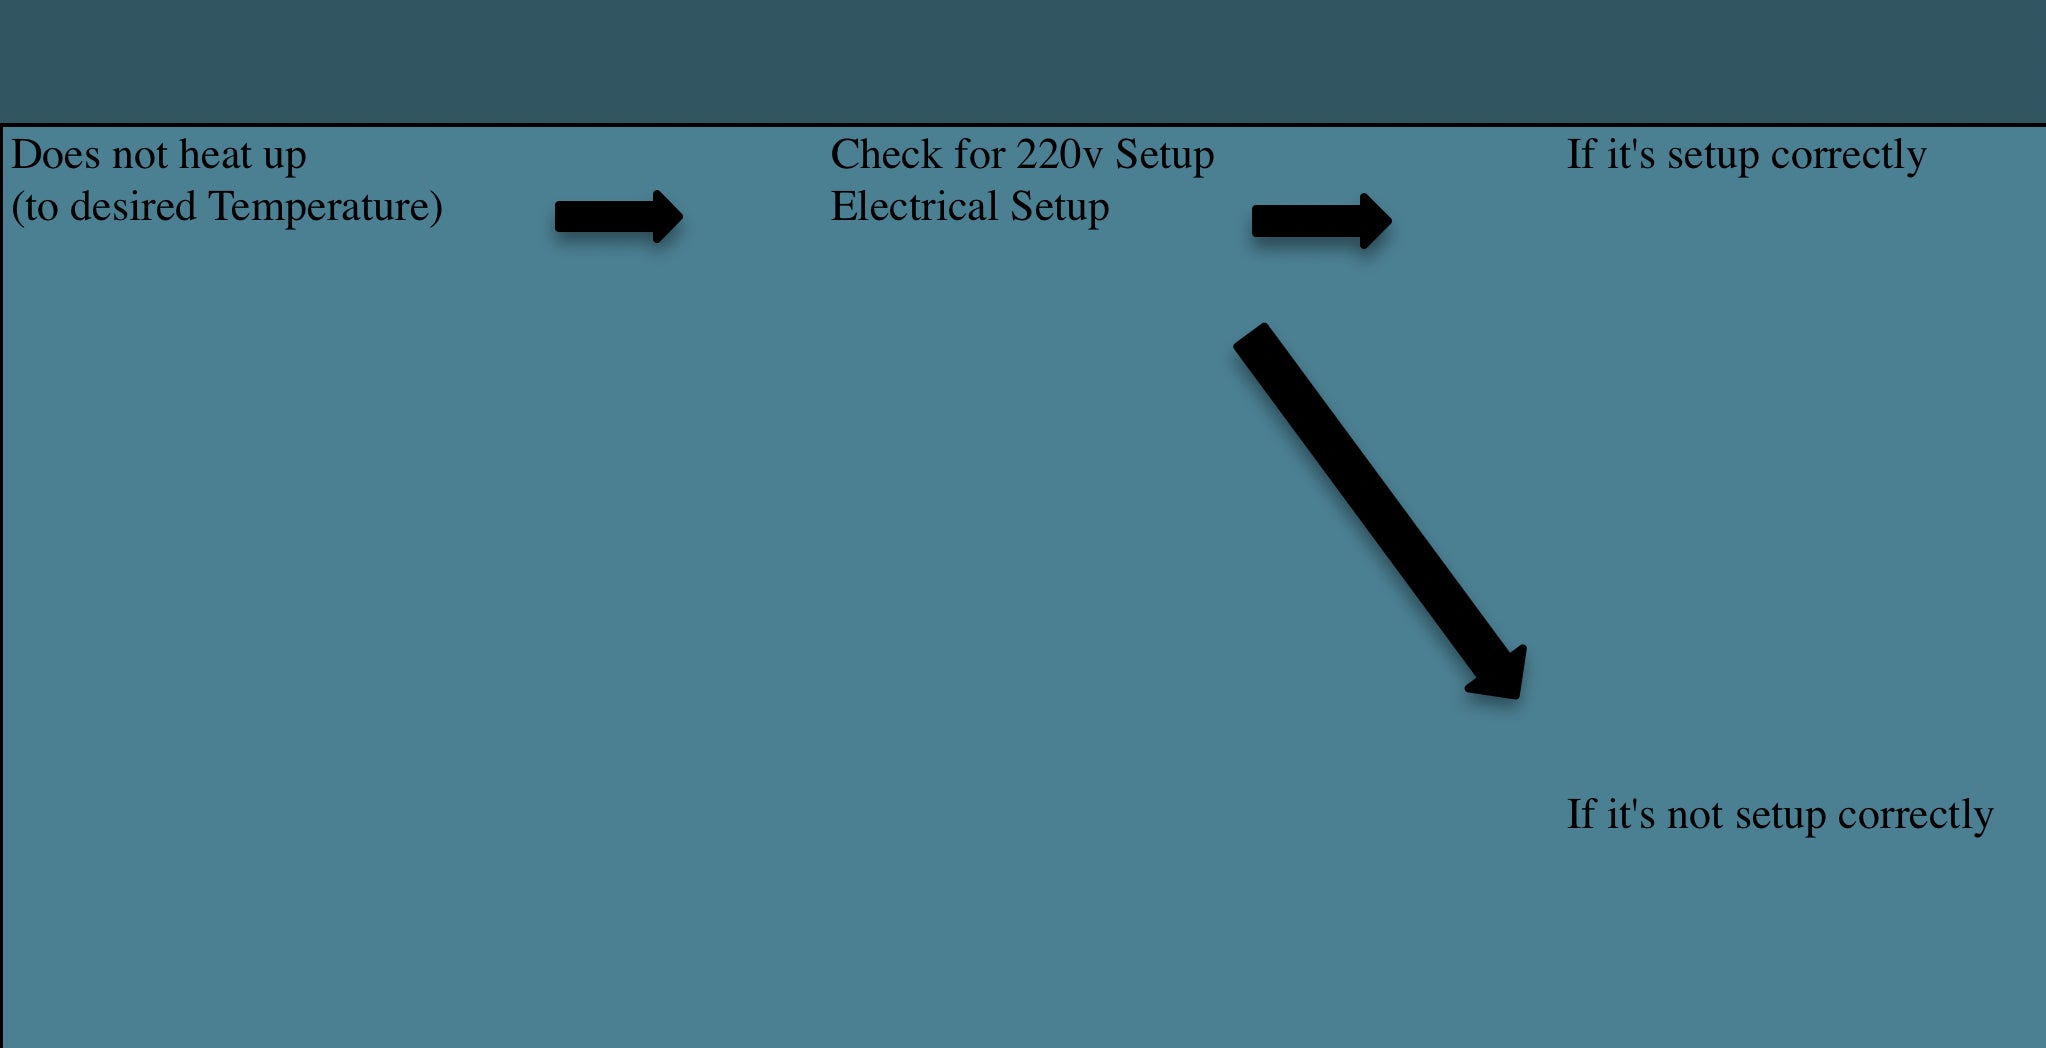

1.2 Touch Screen Does not Turn on OR does not turn on at all.


1.3 Touchscreen's Temperature display inaccurate

1.4 Wiring Instruction/Confusion
Send "Electric Oven Wiring Instruction"
1.5 E1 Error Code (Requires Replacement "White Cable")
Send replacement "White Cable" And Replacement Instruction Video
1.6 Changing Display Temperature from °C or °F (Vice Versa) Touchscreen model only.
Press and Hold "Key" Icon for 20 seconds. The temp. unit displayed will then be switched.
1.7 The Oven cannot be turned on
Send resetting oven instruction
If not fix: Replacement Entire Unit
Note: Always Make Sure Cust. Wire the Electric Oven Using 220v Single Split-Phase.
This article contains the following topics:
- The oven does not heat up (To desired Temperature)
- Touch Screen Does not Turn on OR does not turn on at all.
-----------------------------------------------------------------------------------------------------------------------------------
The oven does not heat up (To the desired Temperature)

-----------------------------------------------------------------------------------------------------------------------------------
Touch Screen Does not Turn on OR does not turn on at all.










 LOG IN | Create



 added to cart
 Select A Custom Kitchen Tool Set